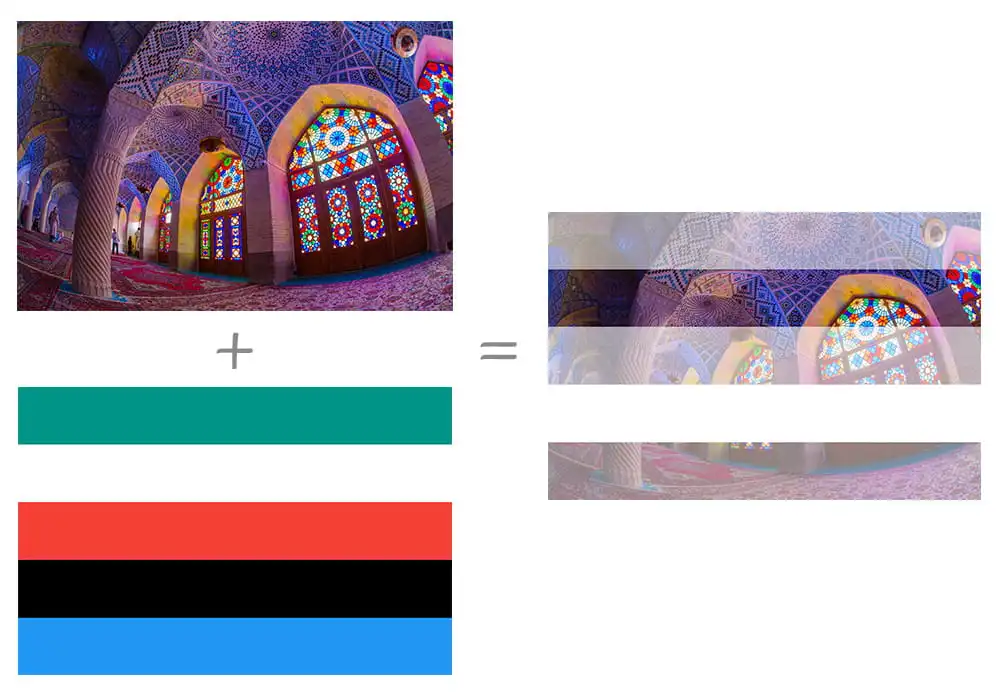
CSS Advanced Notes
CSS Border
Border Radius
- 不支持负值.
- 圆角以外的区域不可点击, 无法响应
click事件. - 没有继承性:
因此父元素设置
border-radius, 子元素依然是直角效果. 可以给父元素设置overflow:hidden让子元素视觉上表现为圆角. - 支持
border-collapse设置为separate的table/inline-table/table-cell元素. - 每角都支持单独设置
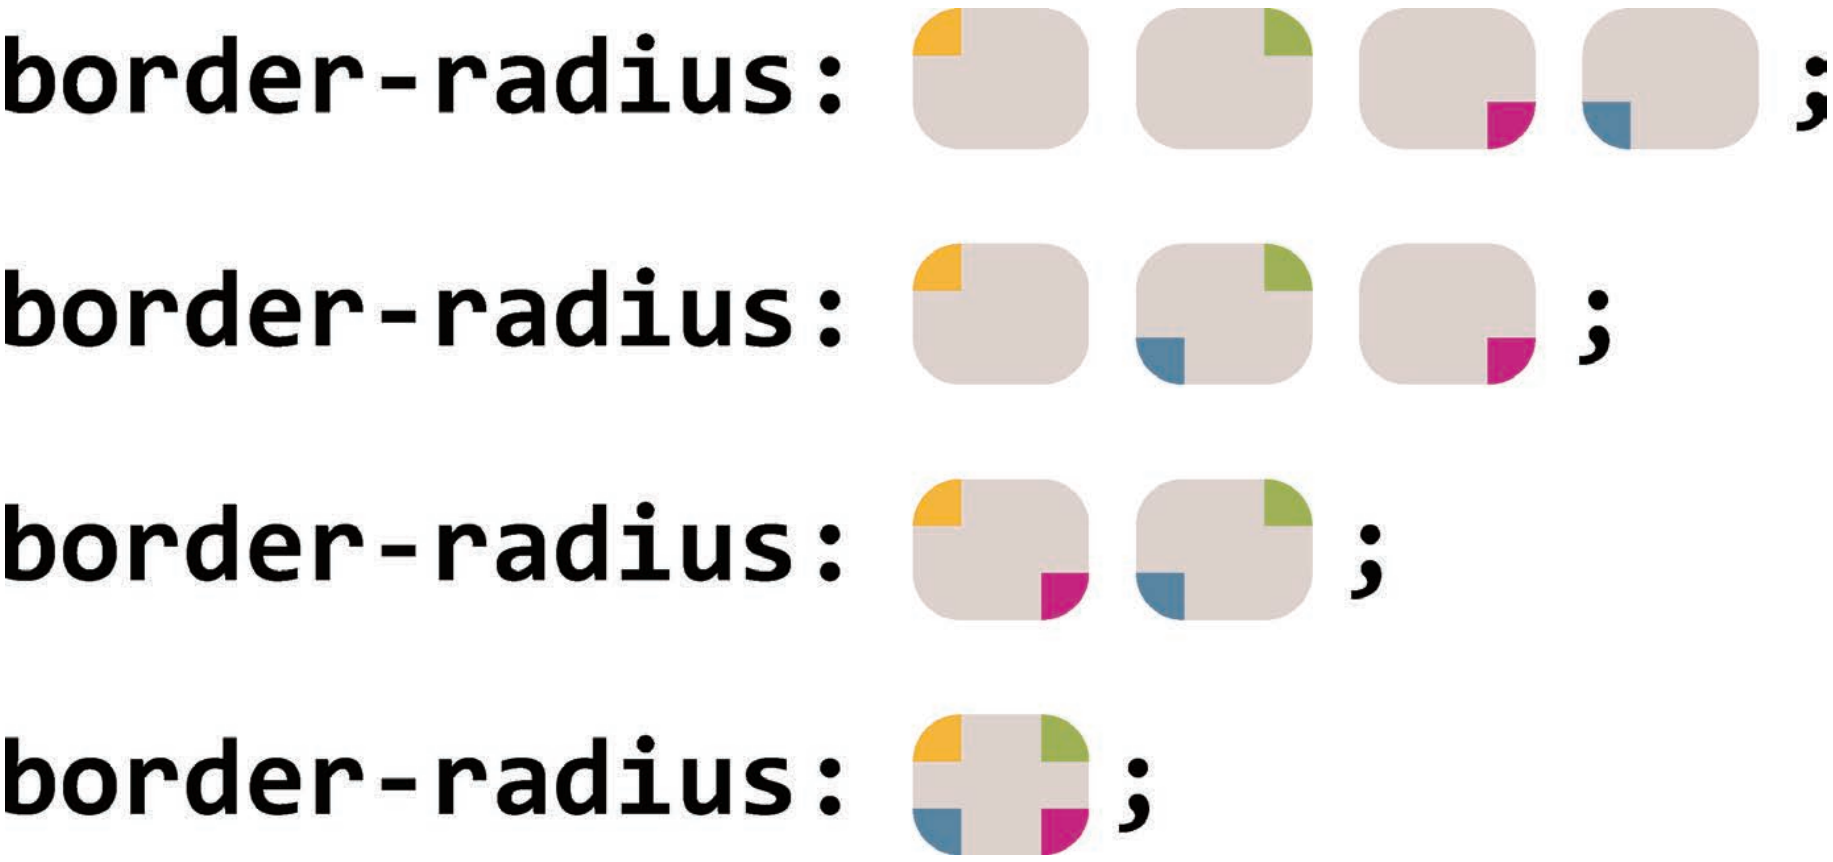
水平半径/垂直半径:<length-percentage>{1, 4} [/ <length-percentage>{1,4}]?.
.box {
  /* 左上 右上+左下 右下 / 左上 右上+左下 右下 */
  border-radius: 10px 5px 2em / 20px 25px 30%;

  /* 左上+右下 右上+左下 / 左上 右上 右下 左下 */
  border-radius: 10px 5% / 20px 25em 30px 35em;

  /* 水平半径 垂直半径 */
  border-top-left-radius: 30px 50%;

  /* 水平半径 垂直半径 */
  border-bottom-left-radius: 20% 15px;
}
圆角曲线重叠时, 所有圆角半径都缩小至 倍:
.w-150px-h-100px {
  /* f = min(0.50, 0.50) = 0.50 */
  border-radius: 100%;
  border-radius: 75px / 50px;

  /* f = min(0.50, 0.33) = 0.33 */
  border-radius: 150px;
  border-radius: 50px;
}
Border Color
Alpha Border
半透明边框:
.box {
  background: white;
  background-clip: padding-box;
  border: 10px solid hsl(0deg 0% 100% / 50%);
}
Transparent Border
利用透明边框扩大元素点击区域,
并利用 background-clip: padding-box 隐藏边框:
.icon-clear {
  width: 16px;
  height: 16px;
  background-clip: padding-box;
  border: 11px solid transparent;
}
Border Style
利用 solid border 模拟链接下划线:
.link {
  padding-bottom: 5px;
  text-decoration: none;
  border-bottom: 1px solid;
}
Border Image
- 以九宫格为基本模式,
content-box为九宫格中间格子. - 可以结合
clip-path裁剪边框. - 可用于实现自定义边框: 渐变边框, 条纹边框, 虚线边框.
<'border-image-source'>||<'border-image-slice'> / <'border-image- width'> / <'border-image-outset'>||<'border-image-repeat'>.
.box {
  border-image: url('./grid-nine.svg') 54 33.33% 33.33% 54 / 10px 20px 30px 1 / 1 30px 20px 10px round space;
}
.border-linear-gradient {
  border-style: solid;
  border-image: linear-gradient(deepskyblue, deeppink) 20 / 10px;
  clip-path: inset(0 round 10px);
}

.border-radial-gradient {
  border-style: solid;
  border-image: radial-gradient(deepskyblue, deeppink) 20 / 10px;
  clip-path: inset(0 round 10px);
}

.border-stripe {
  border: 12px solid;
  border-image: repeating-linear-gradient(-45deg, red, red 5px, transparent 5px, transparent 10px) 12;
}

.border-dashed {
  border: 1px dashed deepskyblue;
  border-image: repeating-linear-gradient(135deg, deepskyblue, deepskyblue 5px, transparent 5px, transparent 10px) 1;
}
Border Collapse
table,
tr,
td {
  border: 1px solid #666;
}

table {
  border-collapse: collapse;
}
Box Decoration Break
- Control
background/border/border-image/box-shadow/clip-path/margin/paddingstyles when lines break. slice: initial value, 断开部分样式直接切割.clone: 断开部分样式独立渲染.
Multiple Border
border.outline.backgroundgradient:box-shadow.clip-path.- Pseudo element.
- SVG
stroke-dasharray.
CSS Outline
initialvalue:medium none currentcolor.outlinedo not take up space, it overlap margins and surrounding elements.outlinedo not change elementsizeandposition.outlineis same on all sides.
.input {
  outline: none;
}

.input:focus {
  border-color: var(--highlight);
}

.button:focus-visible {
  outline: 1px solid #000;
  outline-offset: 3px;
}

.button:focus:not(:focus-visible) {
  outline: none;
}

.image:active {
  outline: 50px solid rgb(0 0 0 / 10%);
  outline-offset: -50px;
}
CSS Shadow
Text Shadow
none.<shadow-text>#:<length>{2,3} && <color>?.- 支持多重阴影.
- 不支持内阴影.
<length>{2,3}: 不支持扩展阴影offset-x offset-y blur-radius.<color>?: defaultrevert(user agent color).
:root {
  --colo: #c0c0c0;
  --br-shadow: -6px 6px 15px rgb(0 0 0 / 50%);
  --tl-shadow: 6px -6px 15px rgb(255 255 255/80%);
}

body {
  background: var(--color);
}

/* 新拟物文字 */
.neumorphic-text {
  color: var(--color);
  text-shadow: var(--br-shadow), var(--tl-shadow);
}

/* 印刷文字 */
.press-text {
  color: hsl(210deg 13% 75%);
  text-shadow: 0 -1px 1px black;
  background: hsl(210deg 13% 40%);
}

/* 描边文字 */
.stroked-text {
  color: white;
  text-shadow:
    1px 1px black,
    -1px -1px black,
    1px -1px black,
    -1px 1px black;
}

/* 发光文字 */
.glow-text {
  color: #ffc;
  text-shadow:
    0 0 0.1em,
    0 0 0.3em;
  background: #203;
}

/* 凸起文字 */
.extruded-text {
  color: white;
  text-shadow:
    0 1px hsl(0deg 0% 85%),
    0 2px hsl(0deg 0% 80%),
    0 3px hsl(0deg 0% 75%),
    0 4px hsl(0deg 0% 70%),
    0 5px hsl(0deg 0% 65%),
    0 5px 10px black;
  background: #58a;
}

/* 复古文字 */
.retro-text {
  color: white;
  text-shadow:
    1px 1px black,
    2px 2px black,
    3px 3px black,
    4px 4px black,
    5px 5px black,
    6px 6px black,
    7px 7px black,
    8px 8px black;
  background: hsl(0deg 50% 45%);
}
Box Shadow
none.<shadow>#:inset? && <length>{2,4} && <color>?.- 支持多重阴影.
inset?: 支持内阴影.<length>{2,4}: 支持扩展阴影offset-x offset-y blur-radius spread-radius.<color>?: defaultcurrentcolor(text computed color).
Basic Box Shadow
.box {
  /* offset-x | offset-y | blur-radius | color */
  box-shadow: 10px 5px 5px black;

  /* offset-x | offset-y | blur-radius | spread-radius | color */
  box-shadow: 2px 2px 2px 1px rgb(0 0 0 / 20%);
}
Side Box Shadow
Bottom side box shadow:
.box {
  box-shadow: 0 5px 4px -4px black;
}
Right and bottom sides box shadow:
.box {
  box-shadow: 3px 3px 6px -3px black;
}
Two opposite sides box shadow:
.box {
  box-shadow:
    5px 0 5px -5px black,
    -5px 0 5px -5px black;
}
Inset Box Shadow
模拟边框:
.button-ghost {
  background-color: #fff;

  /* 模拟边框: 左 右 上 下 */
  box-shadow:
    inset 1px 0 #a2a9b6,
    inset -1px 0 #a2a9b6,
    inset 0 1px #a2a9b6,
    inset 0 -1px #a2a9b6;
}
模拟背景:
.button:active {
  box-shadow: inset 0 0 0 999px rgb(0 0 0 / 10%);
}
Neumorphic Box Shadow
.neumorphic {
  box-shadow:
    -10px -10px 15px rgb(255 255 255 / 50%),
    10px 10px 15px rgb(70 70 70 / 12%);
}

.neumorphic:active {
  box-shadow:
    inset -10px -10px 15px rgb(255 255 255 / 50%),
    inset 10px 10px 15px rgb(70 70 70 / 12%);
}
CSS Background
Background Color
<color>:initialvaluetransparent.backgroundshorthand property:background-colorvalue only be included in last layer specified.
Background Image
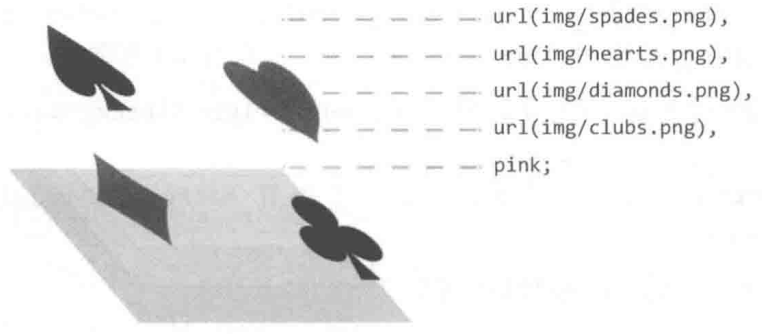
url().image-set([<image> <resolution>]#).linear-gradient().radial-gradient().conic-gradient().- 语法越靠后的背景图像的层叠等级越低:
background一般设置为background-image# background-color.
.image-set {
  width: 128px;
  height: 96px;
  background: url('fallback.jpg');
  background: image-set(url('w128px.jpg') 1x, url('w256px.jpg') 2x, url('w512px.jpg') 3x);
  background-size: cover;
}
Background Repeat
.background-repeat {
  /* Keyword values */
  background-repeat: repeat-x;
  background-repeat: repeat-y;
  background-repeat: repeat;
  background-repeat: space;
  background-repeat: round;
  background-repeat: no-repeat;

  /* Two-value syntax: horizontal | vertical */
  background-repeat: repeat space;
  background-repeat: repeat repeat;
  background-repeat: round space;
  background-repeat: no-repeat round;
}
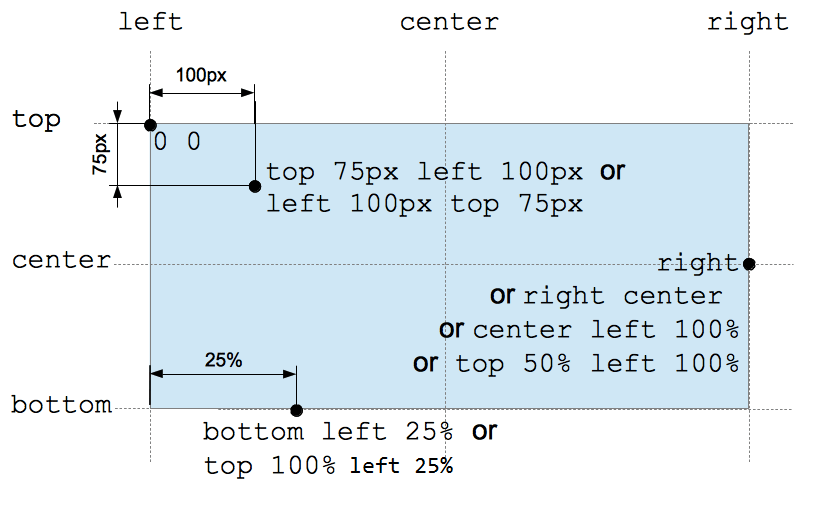
Background Position
Percentage background position (<position> type):
- X offset value =
(container width - image width) * (position x%). - Y offset value =
(container height - image height) * (position y%).
/* Keyword values */
background-position: top;
background-position: bottom;
background-position: left;
background-position: right;
background-position: center;

/* <percentage> values */
background-position: 25% 75%;

/* <length> values */
background-position: 0 0;
background-position: 1cm 2cm;
background-position: 10ch 8em;

/* Multiple images */
background-position:
  0 0,
  center;

/* Edge offsets values */
background-position: bottom 10px right 20px;
background-position: right 3em bottom 10px;
background-position: bottom 10px right;
background-position: top right 10px;
Background Clip
指定背景显示范围:
border-box.padding-box: 虽然border层叠等级高于background, 但是透明边框在视觉上仍会被有色背景覆盖 (背景会延伸至边框下方). 设置background-clip: padding-box可用于保证border-color: transparent不被background-color: white视觉覆盖.content-box.text: 可用于实现渐变文字/镂空文字/背景蒙版文字.
@property --offset {
  syntax: '<length>';
  inherits: false;
  initial-value: 5px;
}

@keyframes move {
  to {
    --offset: 15px;
  }
}

p {
  color: #000;
}

/* 同心圆外扩动画 */
p:hover {
  color: transparent;
  background: repeating-radial-gradient(
    circle at 0 0,
    #000 calc(var(--offset) - 5px),
    #000 var(--offset),
    #fff var(--offset),
    #fff calc(var(--offset) + 5px)
  );
  background-clip: text; /* -webkit-background-clip: text; */
  animation: move 0.5s infinite linear;
}
可以利用多重背景实现 border-image:
background: linear-gradient(white, white) padding-box, var(--repeating-stripe-gradient),
语法靠前的 padding-box 白色背景处于高层, 遮住大部分条纹背景,
导致条纹背景只显示在 border 区域, 从而模拟实现 border-image 效果.
.stripe-border {
  padding: 1em;
  background:
    linear-gradient(white, white) padding-box,
    repeating-linear-gradient(
        -45deg,
        red 0,
        red 12.5%,
        transparent 0,
        transparent 25%,
        #58a 0,
        #58a 37.5%,
        transparent 0,
        transparent 50%
      )
      0 / 5em 5em;
  border: 1em solid transparent;
}
Background Origin
指定背景绘制起点:
padding-box.border-box.content-box.- 影响
background-size: <percentage>大小. - 影响
background-position定位. - 影响起点两侧背景样式细节.
Background Size
auto{1,2}:- 具有 intrinsic size 的背景 (e.g 位图),
computed to
[intrinsic size, intrinsic size]. - 具有一个方向 intrinsic size, 具有 intrinsic ratio 的背景 (e.g 矢量图),
computed to
[intrinsic size, intrinsic size * intrinsic ratio]. - 具有一个方向 intrinsic size, 不具有 intrinsic ratio 的背景 (e.g 矢量图),
computed to
[intrinsic size, extrinsic size]. - 不具有 intrinsic size, 具有 intrinsic ratio 的背景 (e.g 矢量图),
computed to
contain(等比例缩放). - 不具有 intrinsic size, 不具有 intrinsic ratio 的背景 (e.g CSS gradient),
computed to
[extrinsic size, extrinsic size].
- 具有 intrinsic size 的背景 (e.g 位图),
computed to
cover: 等比例裁剪, 部分图像会裁剪.contain: 等比例缩放, 部分区域会留白.<length-percentage>{1,2}:<percentage>: calculate by extrinsic size andbackground-originbox.
.background-size {
  background-size: cover;
  background-size: contain;
  background-size: 100%;
  background-size: 20px;
  background-size: auto 100%;
  background-size: auto 20px;
  background-size: 100% 100%;
  background-size: 20px 20px;
}

.video {
  min-width: 100%;
  min-height: 100%;
  overflow: hidden;
  background-size: cover;
}
Background Attachment
scroll: scrolls with main view, but stays fixed inside local view.local: scrolls both with main view and local view.fixed: stays fixed no matter what.
Background Scroll View
对于可以滚动的元素 (overflow: scroll):
- 当
background-attachment: scroll时, 背景图不会随元素内容的滚动而滚动 (fixed inside local view). - 当
background-attachment: local时, 背景图会随元素内容的滚动而滚动 (scroll with local view).
滚动阴影:
/**
 * 纯白渐变背景随列表滚动而滚动, 灰度渐变背景不随列表滚动而滚动.
 * 列表滚动时, 纯白渐变背景移出视口, 露出灰度渐变背景.
 */
.scrollable-list {
  background: linear-gradient(#fff 30%, transparent), radial-gradient(at 50% 0, rgb(0 0 0 / 20%), transparent 70%);
  background-repeat: no-repeat;
  background-attachment: local, scroll;
  background-size:
    100% 50px,
    100% 15px;
}
Background Parallax Effect
Implement scroll parallax effect background-attachment: fixed:
/* parallax effect */
body {
  box-sizing: border-box;
  width: 100%;
  height: 100vh;
  padding: 0;
  margin: 0;
}

.parallax {
  min-height: 60%; /* key */
  background-image: url('./images/bg.jpg');
  background-repeat: no-repeat;
  background-attachment: fixed; /* key */
  background-position: center;
  background-size: cover;
}
CSS Gradient
Color Stop List
<color-stop-list>,
[<linear-color-stop> [, <linear-color-hint>]?]#, <linear-color-stop>:
<linear-color-stop>:<color> <length-percentage>{1,2}?.<linear-color-hint>:<length-percentage>, 改变颜色的转换点位置.<length-percentage>:<length> | <percentage>.
<angular-color-stop-list>,
[<angular-color-stop> [, <angular-color-hint>]?]#, <angular-color-stop>:
<angular-color-stop>:<color> && <angle-percentage>{1,2}?.<angular-color-hint>:<angle-percentage>, 改变颜色的转换点位置.<angle-percentage>:<angle> | <percentage>.
若后一个色标的位置值为 0,
则它的位置总是会被浏览器调整为前一个色标的位置值:
/* 条纹形状 */
.stripe {
  background: linear-gradient(yellow 30%, blue 0);
  background: linear-gradient(yellow 33.3%, blue 0 66.6%, yellowgreen 0);
  background-size: 100% 45px;
}
Linear Gradient
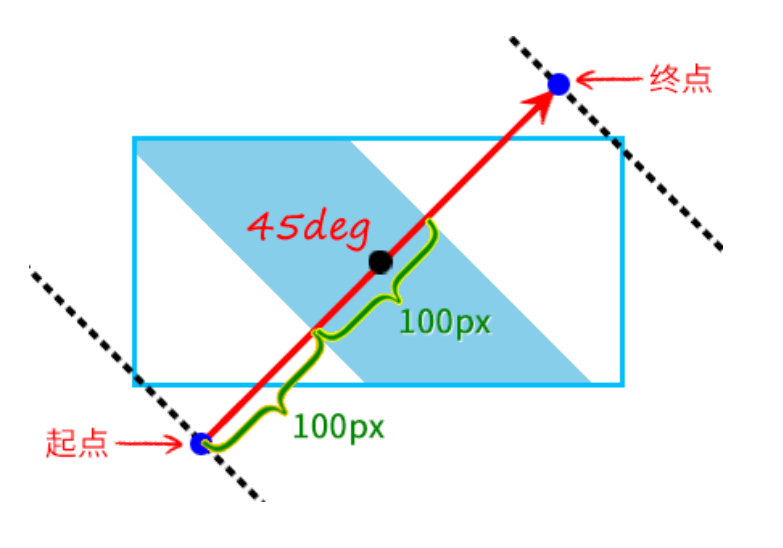
[<angle> | to <side-or-corner>]?, <color-stop-list>.- Default angle:
to bottom. 0degangle:to top.90degangle:to right.-90degangle:to left.
.linear-gradient {
  width: 300px;
  height: 150px;
  background-image: linear-gradient(45deg, white 100px, skyblue 100px 200px, white 200px);
  border: solid deepskyblue;
}
Radial Gradient
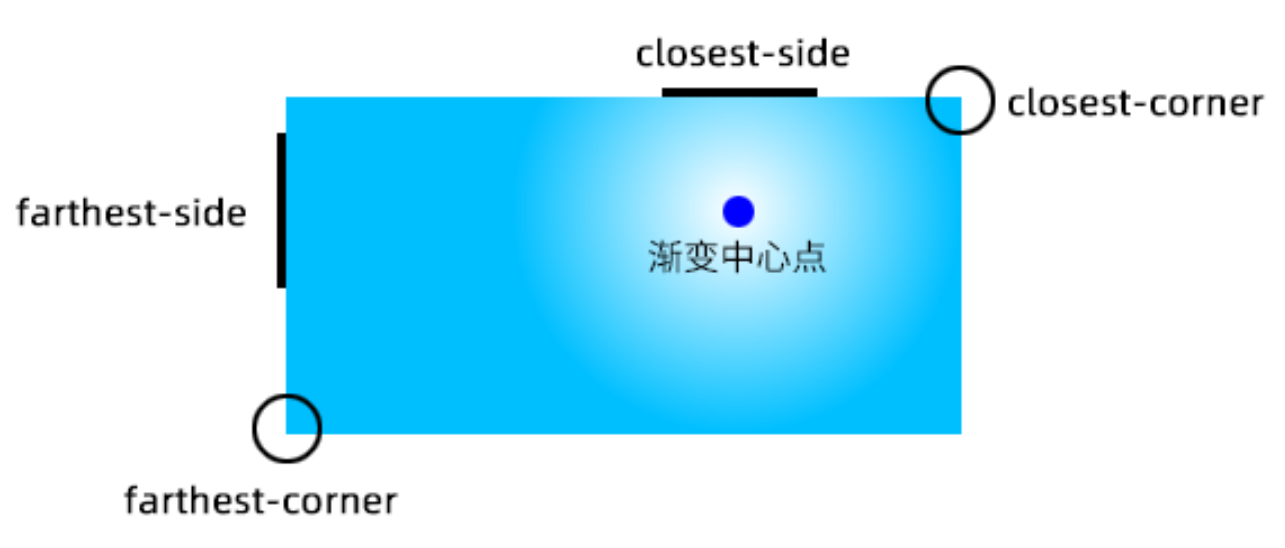
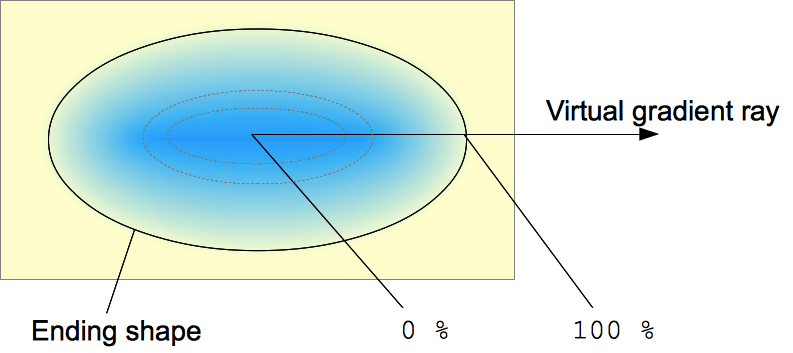
[<ending-shape> || <size>]? [at <position>]?, <color-stop-list>.<ending-shape>:ellipse(initial value).circle.
<size>.closest-side.farthest-side.closest-corner.farthest-corner.<length>: 单独一个值不能为<percentage>.<length-percentage>{2}.
.radial-gradient {
  background-image: radial-gradient(50px, white, deepskyblue);
  /* stylelint-disable-next-line declaration-property-value-no-unknown */
  background-image: radial-gradient(50px 50%, white, deepskyblue);
  /* stylelint-disable-next-line declaration-property-value-no-unknown */
  background-image: radial-gradient(50% 50%, white, deepskyblue);
  background-image: radial-gradient(100px at 0 0, white, deepskyblue);
  background-image: radial-gradient(100px at left top, white, deepskyblue);
  background-image: radial-gradient(100px at right 100px bottom 100px, white, deepskyblue);
  background-image: radial-gradient(farthest-corner circle at right 100px bottom 100px, white, deepskyblue);
}
Conic Gradient
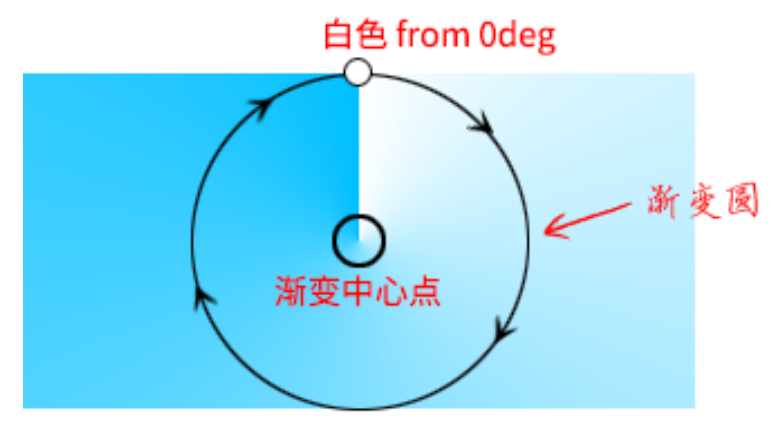
[from <angle>]? [at <position>]?, <angular-color-stop-list>.- Default angle:
0deg.
.pie {
  width: 150px;
  height: 150px;
  background: conic-gradient(yellowgreen 40%, gold 0deg 75%, deepskyblue 0deg);
  border-radius: 50%;
}

.color-picker-wheel {
  width: 150px;
  height: 150px;
  background:
    radial-gradient(closest-side circle, gray, transparent), conic-gradient(red, magenta, blue, aqua, lime, yellow, red);
  border-radius: 50%;
}
Gradient Reference
- Background gradient loading spinner.
- Background gradient shapes.
CSS Object
Object Fit
object-fit
只对替换元素
(replaced element)
有作用:
input.select.textarea.img.video.iframe.embed.object.
object-fit
是作用于 replaced element 的 background-size,
可以处理图片拉伸变形与 Cumulative Layout Shift 问题:
fill.contain.cover.none.scale-down.
.image-container {
  position: relative;
  padding-bottom: calc(2 / 3 * 100%); /* (height / width) ratio */
  overflow: hidden;
}

.image-container > img {
  position: absolute;
  width: 100%;
  max-width: 100%;
  height: 100%;
  object-fit: cover;
}

.image-container > .aspect-ratio {
  width: 100%;
  aspect-ratio: 16 / 9;
  object-fit: cover;
}

.flexbox-container {
  display: flex;
  gap: var(--space-gutter-s);
  align-items: flex-start;
  font-size: var(--text-size-meta);
}

.flexbox-container img.aspect-ratio {
  flex-shrink: 0;
  width: clamp(4rem, 30%, 6rem);
  aspect-ratio: 1 / 1;
  object-fit: cover;
  border-radius: 50%;
}
Object Position
object-position
是作用于 replaced element 的 background-position:
img {
  /* <percentage> values */
  object-position: 25% 75%;

  /* Keyword values */
  object-position: top;
  object-position: bottom;
  object-position: left;
  object-position: right;
  object-position: center;

  /* <length> values */
  object-position: 0 0;
  object-position: 1cm 2cm;
  object-position: 10ch 8em;

  /* Edge offsets values */
  object-position: bottom 10px right 20px;
  object-position: right 3em bottom 10px;
  object-position: top 0 right 10px;
}
Replaced Media Size
Replaced media size normalize style:
input,
textarea,
img,
video,
object {
  box-sizing: border-box;
  max-width: 100%;
  height: auto;
}
Embed Object Container
<div class="embed-container">
  <iframe src="http://www.youtube.com/embed/B1_N28DA3gY" frameborder="0" allowfullscreen></iframe>
</div>

<style>
  .embed-container {
    position: relative;
    max-width: 100%;
    height: 0;
    height: auto;
    padding-bottom: 56.25%;
    overflow: hidden;
  }

  .embed-container iframe,
  .embed-container object,
  .embed-container embed {
    position: absolute;
    top: 0;
    left: 0;
    width: 100%;
    height: 100%;
  }
</style>
CSS Shape
aspect-ratio.border.box-shadow(inset).- Background:
position/size/color/image/gradient. In modern browsers, background shapes withtransition/transformare better than pseudo elements. clip-path.maskfilter.- SVG:
- SVG icon.
- SVG filter.
- SVG clip-path.
- SVG mask.
- Pseudo elements.
Shape Outside
shape-outside
provides a way to customize wrapping effect for float element,
combined with
shape-margin
`shape-image-threshold
making it possible to wrap text around complex objects rather than simple boxes:
.shape {
  float: left;
  shape-outside: polygon(50% 0, 100% 50%, 50% 100%, 0 50%);
  shape-image-threshold: 20%;
  shape-margin: 20px;
}
Clip
clip
属性只对 absolute 与 fixed 元素起作用,
是对 overflow 属性的有力补充
(overflow 对于上述两种元素的裁剪作用有限):
auto.rect(<top-length>, <right-length>, <bottom-length>, <left-length>).clip元素clientWidth,clientHeight,computedStyle保持不变: 仅视觉上裁剪, 元素尺寸仍为原本尺寸, 原始布局仍然保留.clip元素非可见部分无法响应点击事件.
.fixed-clip {
  position: fixed;
  clip-path: rect(30px 200px 200px 20px);
}
Clip Path
none.<url>.<geometry-box> || <basic-shape>:<geometry-box>:border-box.padding-box.content-box.margin-box.fill-box.stroke-box.view-box.
<basic-shape>:
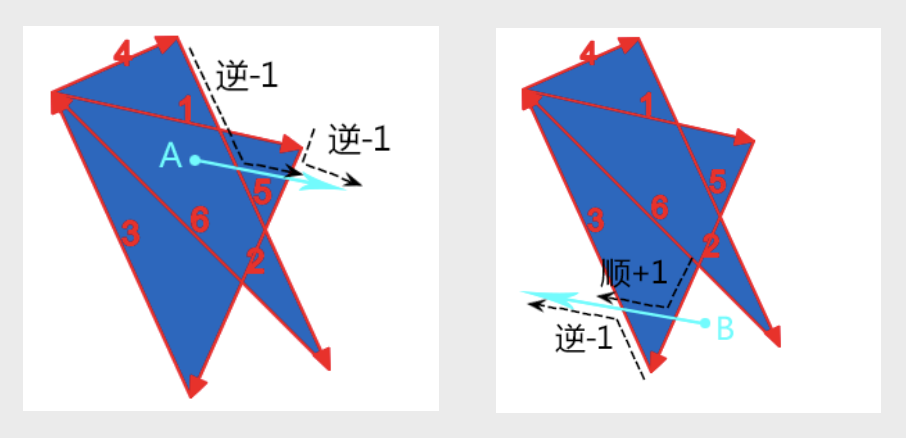
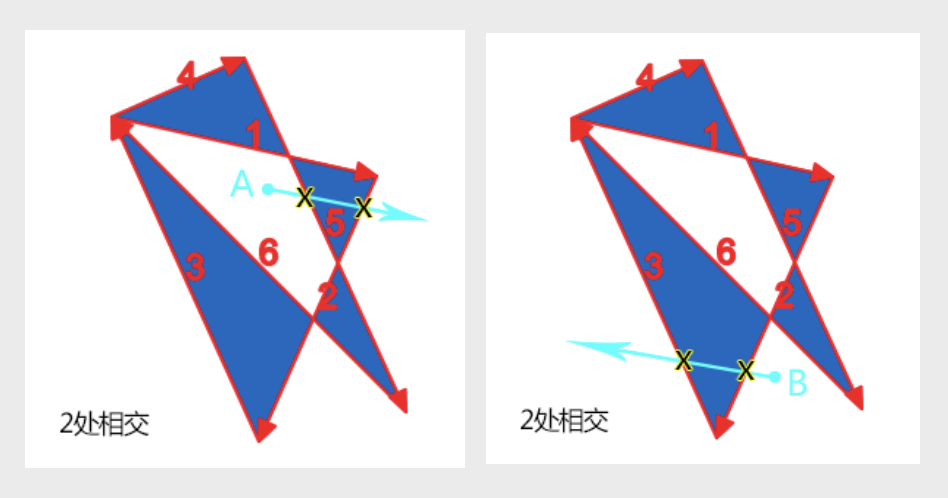
clip-path元素clientWidth,clientHeight,computedStyle保持不变: 仅视觉上裁剪, 元素尺寸仍为原本尺寸, 原始布局仍然保留.clip-path元素非可见部分无法响应点击事件.<fill-rule>用于确定复杂路径构成的图形的内部与外部, 内部填充, 外部透明.
.clip-path {
  clip-path: inset(10% 20% 30% 40%);
  clip-path: circle(50% at 50% 50%);
  clip-path: ellipse(50% 25% at 50% 50%);
  clip-path: polygon(0 0, 100% 0, 100% 100%, 0 100%);
  clip-path: path('M 0 0 L 100 0 L 100 100 L 0 100 Z');
}
Mask
mask:
- 元素应用
mask属性遮罩效果后, 透明部分仍然可以响应点击事件.
Mask Image
none.<url>#.<gradient>#.<image()>.<image-set()>.<paint()>.<element()>.<cross-fade()>.
Mask Mode
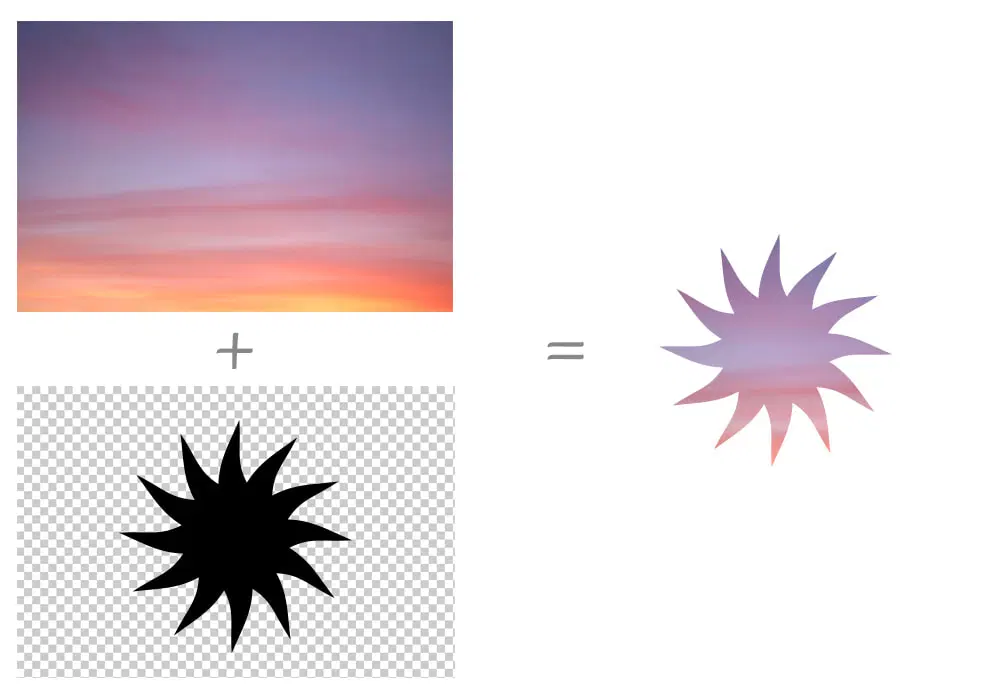
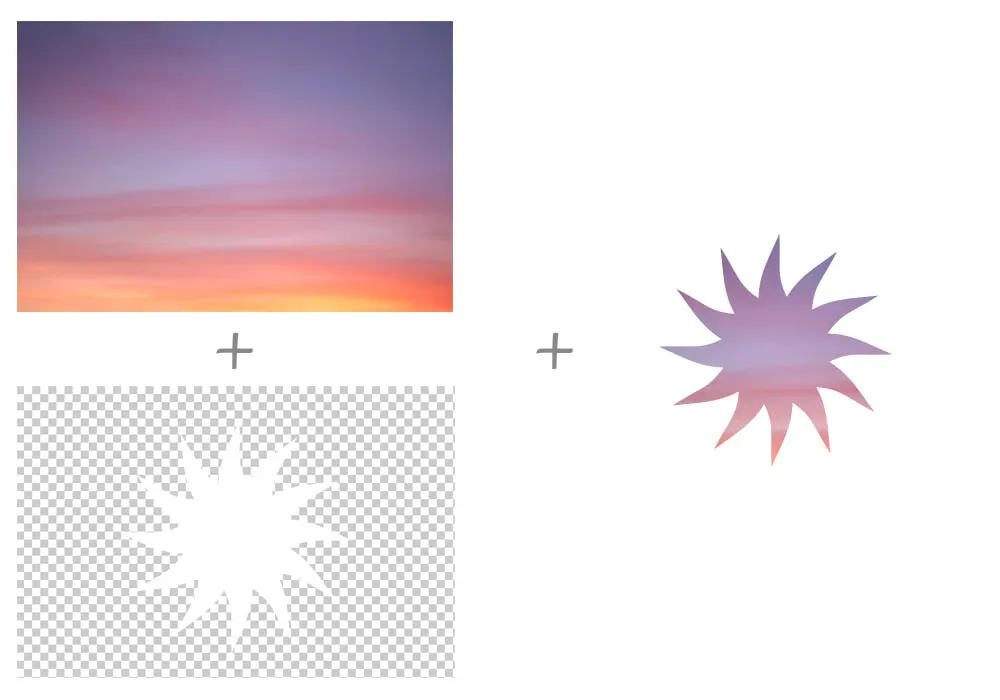
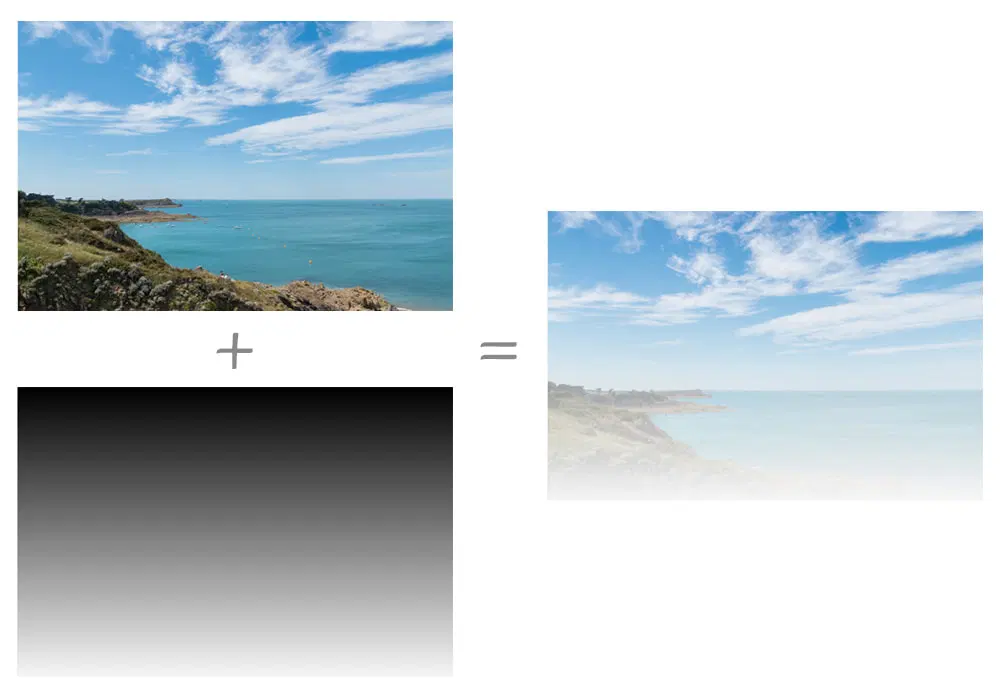
match-source: 根据mask-image类型自动选择模式, SVG<mask>元素 (url(#mask-id)) 为luminance模式, 其余场景 (包括url('mask.svg')) 为alpha模式.alpha: 基于透明度进行遮罩,alpha(100%)for show,transparentfor hidden.luminance: 基于亮度进行遮罩,alpha(100%)且为亮色 for show,alpha(100%)且为暗色 for hidden,transparentfor hidden.
img.alpha-mask {
  mask-image: linear-gradient(black, transparent);
  mask-mode: alpha;
}
Mask Type
mask-type,
用于设置 SVG <mask> 元素的遮罩模式:
luminance.mask.
Mask Repeat
| Single Value | Two Value Equivalent |
|---|---|
no-repeat | no-repeat no-repeat |
repeat-x | repeat no-repeat |
repeat-y | no-repeat repeat |
repeat | repeat repeat |
space | space space |
round | round round |
Mask Position
.mask-position {
  /* Keyword values */
  mask-position: center;
  mask-position: top right;
  mask-position: bottom left;

  /* <length-percentage> values */
  mask-position: 25% 75%;
  mask-position: 0 0;
  mask-position: 10% 8em;
}
Mask Clip
border-box.padding-box.content-box.margin-box.fill-box.stroke-box.view-box.no-clip.
Mask Origin
border-box.padding-box.content-box.margin-box.fill-box.stroke-box.view-box.
Mask Size
auto{1,2}.cover.contain.<length-percentage>{12}.
Mask Composite
add: 所有遮罩图片直接合成一个完整的遮罩.subtract: 顶层遮罩图片中, 与底层遮罩图片重合的区域不显示遮罩.intersect: 顶层遮罩图片中, 与底层遮罩图片重合的区域才显示遮罩.exclude: 遮罩图片重合的区域被当作透明区域 (transparent), 其余区域直接合成一个完整的遮罩 (add).mask-image中语法越靠后的遮罩图片层叠等级越低.
.masked {
  width: 100px;
  height: 100px;
  background-color: #8cffa0;
  mask-image:
    url('https://mdn.mozillademos.org/files/12668/MDN.svg'), url('https://mdn.mozillademos.org/files/12676/star.svg');
  mask-size: 100% 100%;
  mask-composite: add;
}
CSS Filter and Blend
Filter
.filter {
  filter: blur(5px); /* 模糊 */
  filter: brightness(240%); /* 亮度 */
  filter: contrast(200%); /* 对比度 */
  filter: drop-shadow(16px 16px 20px blue); /* 投影 */
  filter: grayscale(50%); /* 灰度 */
  filter: hue-rotate(90deg); /* 色相旋转 */
  filter: invert(75%); /* 反相 (颜色翻转) */
  filter: opacity(25%); /* 透明度 */
  filter: saturate(30%); /* 饱和度 */
  filter: sepia(60%); /* 褐色 (老照片) */
  filter: url('resources.svg'); /* 引用 SVG filter 元素 */

  /* Apply multiple filters */
  filter: contrast(175%) brightness(3%);
}
filter: drop-shadow():
- 不支持多重阴影.
- 不支持内阴影.
- 不支持扩展阴影.
- 阴影会自动贴合形状:
- 伪元素.
- 自定义边框.
- 背景渐变.
- SVG 元素.
Backdrop Filter
让当前元素所在区域后面的内容应用滤镜效果.
.dropdown-list {
  background: hsl(0deg 0% 100% / 75%);
  backdrop-filter: blur(5px);
}
若当前浏览器不支持 backdrop-filter,
可使用 pseudo element + filter 进行模拟:
/* 设置两张重合图片 */
body,
main::before {
  background: url('tiger.jpg') 0 / cover fixed;
}

main {
  position: relative;
  overflow: hidden;
  background: hsl(0deg 0% 100% / 30%);
}

/* 模糊文字背景图片 */
main::before {
  position: absolute;
  inset: 0;
  margin: -30px;
  content: '';
  filter: blur(20px);
}
Blend Mode
multiply:- 正片叠底: .
- 混合黑色变黑色.
- 混合白色不变色.
- 混合后颜色变暗.
screen:- 滤色: .
- 混合黑色不变色.
- 混合白色变白色.
- 混合后颜色变亮.
darken/lighten:- 变暗: .
- 变亮: .
- 可用于实现渐变文字.
color-dodge:- 颜色变淡: .
- 可用于保护底图的高光, 适合处理高光下的人物照片: 通过将照片和特定颜色混合, 可以改变整个照片的色调 (暖色调或是冷色调), 同时不会影响人物高光区域的细节.
color-burn:- 颜色加深: .
- 可用于保护底图的阴影, 适合处理阴影丰富的照片: 通过将照片和特定颜色混合, 可以营造更加幽深的氛围.
overlay:- 叠加 ( 为底图的色值):
- : .
- : .
- 底图的阴影 (黑色)和高光 (白色) 的颜色会被保留, 其他颜色的饱和度和对比度提高, 混合后的图像会更加鲜亮.
- 叠加 ( 为底图的色值):
hard-light:- 强光 ( 为底图的色值):
- : .
- : .
- 图像亮的地方更亮, 暗的地方更暗.
- 强光 ( 为底图的色值):
soft-light:- 柔光 ( 为底图的色值):
- : .
- : .
- 图像亮的地方轻微变亮, 暗的地方轻微变暗.
- 柔光 ( 为底图的色值):
difference:- 差值: .
- 若上层元素为
white, 则最终混合的颜色是底层元素颜色的反色.
exclusion:- 排除: .
hue:- 色相混合.
- 混合后的颜色保留底图的饱和度和亮度, 使用顶图的色相.
- 将照片和渐变色进行色相混合, 可让照片呈现出丰富多彩的色调效果.
saturation:- 饱和度混合.
- 混合后的颜色保留底图的色相和亮度, 使用顶图的饱和度.
luminosity:- 亮度混合.
- 混合后的颜色保留底图的色相和饱和度, 使用顶图的亮度.
- 当底图是渐变图像或纯色图像, 上层元素是复杂图像时, 适合使用亮度混合模式.
color:- 颜色混合.
- 混合后的颜色保留底图的亮度, 使用顶图的色相和饱和度.
- 通过使用 CSS 渐变让照片的色调变得丰富.
Mix Blend Mode
- Used for multiple elements, e.g text styles.
- 通常把混合模式设置在顶层元素上:
当元素应用了混合模式时,
该元素会混合
z轴上所有层叠顺序比其低的层叠元素. multiply:blackis cutout (keepblack).screen:whiteis cutout (keepwhite).
<div class="background">
  <h1>Even More CSS Secrets</h1>
</div>

<style>
  .background {
    background-image: url('bg.png');
    background-repeat: no-repeat;
    background-position: center;
    background-size: cover;
  }

  .background h1 {
    color: white; /* keep white */
    background-color: black; /* mix with background */
    mix-blend-mode: screen; /* screen or multiply  */
  }
</style>
Background Blend Mode
- Used for multiple
background-image.
.box {
  background: url('pic1.png'), url('pic2.png');
  background-size: cover;
  background-blend-mode: lighten; /* lighten, lighten */
}

.gradient-icon {
  background: linear-gradient(deepskyblue, deeppink), url('icon.png'), white;
  background-blend-mode: lighten, normal;
}
Filter and Blend Reference
- Instagram filters.
- Image effects.
- PhotoShop blending modes ultimate guide.
SVG
SVG Size
Shape will zoom to fill size of SVG width and height:
<!-- viewBox = <min-x> <min-y> <width> <height> -->
<svg width="198px" height="188px" viewBox="0 0 99 94"></svg>
SVG Fill
<svg width="100px" height="100px" viewBox="0 0 100 100" version="1.1" xmlns="...">
  <title>My Awesome SVG</title>
  <circle class="circle" cx="50" cy="50" r="50" fill="#FFFF00" />
</svg>

<style>
  .circle {
    fill: currentcolor;
    fill-rule: nonzero;
    fill-opacity: 0.5;
  }
</style>
SVG Stroke
circle {
  stroke: blue;
  stroke-opacity: 0.5;
  stroke-width: 2px;
  stroke-linecap: round;
  stroke-linejoin: round;
  stroke-dasharray: 14px 4px 4px 4px; /* 实色长度 透明长度 实色长度 透明长度 ... */
  stroke-dashoffset: 0;
  paint-order: stroke;
  vector-effect: non-scaling-stroke;
}
利用 stroke-dasharray 与 stroke-dashoffset 实现动画线条:
<a class="container">
  <svg height="100%" width="100%" xmlns="http://www.w3.org/2000/svg">
    <rect class="outline" height="100%" width="100%" />
    <div class="text">SVG Animations</div>
  </svg>
</a>

<style>
  .container .outline {
    stroke-dasharray: 25 25;
    stroke-dashoffset: -588;
  }

  .container:hover .outline {
    stroke-dasharray: 50 50;
    stroke-dashoffset: -275;
  }
</style>
SVG Marker
polyline {
  marker-start: url('#marker-circle');
  marker-mid: url('#marker-circle');
  marker-end: url('#marker-arrow');
}
SVG Shape
- Rectangles and squares:
<rect>. - Circles:
<circle>. - Ellipse:
<ellipse>. - Line:
<line>. - Polyline:
<polyline>. - Polygon:
<polygon>. - Path:
<path>.
SVG Text
The text tag <text> is used to create selectable and accessible text:
text {
  /* SVG text vertical alignment */
  dominant-baseline: auto;
  dominant-baseline: middle;
  dominant-baseline: central;
  dominant-baseline: alphabetic;
  dominant-baseline: hanging;
  dominant-baseline: ideographic;
  dominant-baseline: mathematical;

  /* SVG text horizontal alignment */
  text-anchor: start;
  text-anchor: middle;
  text-anchor: end;
}
SVG Title
The title <title> and description <desc> tags
are specifically for providing accessibility content.
SVG Group
The group tag <g> is used to group elements together
to add class names and apply animations, filters, patterns and effects
to a group of elements.
SVG Defs
The defs tag <defs> is used to define elements for later reuse.
This is where you create
marker, patterns, filters, masks
to be reused later.
This is also used to create icon systems.
<svg width="0" height="0" style="position: absolute">
  <defs>
    <marker id="marker-circle" markerWidth="8" markerHeight="8" refX="4" refY="4">
      <circle cx="4" cy="4" r="2.5" />
    </marker>
    <marker id="marker-arrow" markerWidth="12" markerHeight="12" refX="2" refY="6" orient="auto">
      <path d="M2,3 L2,10 L8,6 L2,3" />
    </marker>
  </defs>
  <defs>
    <filter id="blur">
      <feGaussianBlur in="SourceGraphic" stdDeviation="5" />
    </filter>
  </defs>
</svg>
SVG Path
<div class="circle-word">
  <svg width="400px" height="300px" viewBox="0 0 400 200" version="1.1" xmlns="http://www.w3.org/2000/svg">
    <defs>
      <path id="textCircle" d="M 20 100 A 80 80 0 0 0 180 100 A 80 80 0 0 0 20 100" fill="none" stroke="#333"></path>
    </defs>
    <text class="textCircle" fill="yellowgreen">
      <textPath xmlns:xlink="http://www.w3.org/1999/xlink" xlink:href="#textCircle">
        这是一段随着 path 路径绘制的文字
      </textPath>
    </text>
  </svg>
</div>
SVG Clip Path
<svg class="svg">
  <clipPath id="circle" clipPathUnits="objectBoundingBox">
    <path
      d="M0.5,0 C0.776,0,1,0.224,1,0.5 C1,0.603,0.969,0.7,0.915,0.779 C0.897,0.767,0.876,0.76,0.853,0.76 C0.794,0.76,0.747,0.808,0.747,0.867 C0.747,0.888,0.753,0.908,0.764,0.925 C0.687,0.972,0.597,1,0.5,1 C0.224,1,0,0.776,0,0.5 C0,0.224,0.224,0,0.5,0"
    />
  </clipPath>
</svg>
.item {
  clip-path: url('#circle');
}
SVG Mask
Avatar with circle status indicator:
<svg role="none">
  <mask id="circle">
    <circle fill="white" cx="100" cy="100" r="100"></circle>
    <circle fill="black" cx="86%" cy="86%" r="18"></circle>
  </mask>
  <g mask="url(#circle)">
    <image x="0" y="0" width="100%" height="100%" xlink:href="avatar.jpg"></image>
    <circle fill="none" cx="100" cy="100" r="100" stroke="rgb(0 0 0 / 10%)" stroke-width="2"></circle>
  </g>
</svg>
SVG Filter
内投影滤镜:
<svg width="300" height="300" viewBox="0 0 20 20" style="position: absolute; left: -999px">
  <filter id="inset-shadow">
    <!-- 投影偏移 -->
    <feOffset dx="0" dy="0" />
    <!-- 投影模糊 -->
    <feGaussianBlur stdDeviation="6" result="offset-blur" />
    <!-- 反转投影使其变成内投影 -->
    <feComposite operator="out" in="SourceGraphic" in2="offset-blur" result="inverse" />
    <!-- 内投影附加黑色 -->
    <feFlood flood-color="black" flood-opacity=".95" result="color" />
    <feComposite operator="in" in="color" in2="inverse" result="shadow" />
    <!-- 把内投影显示在图像上 -->
    <feComposite operator="over" in="shadow" in2="SourceGraphic" />
  </filter>
</svg>
毛玻璃滤镜:
<svg width="0" height="0" style="position: absolute">
  <filter id="blur" color-interpolation-filters="sRGB">
    <feGaussianBlur stdDeviation="6" edgeMode="duplicate" />
    <feComponentTransfer>
      <feFuncA type="discrete" tableValues="0 1" />
    </feComponentTransfer>
  </filter>
</svg>
<svg>
  <defs>
    <filter id="fe1">
      <feTurbulence id="animation" type="fractalNoise" baseFrequency="0.00001 9.9999999" numOctaves="1" result="warp">
        <animate
          attributeName="baseFrequency"
          from="0.00001 9.9999"
          to="0.00001 0.001"
          dur="2s"
          repeatCount="indefinite"
        />
      </feTurbulence>
      <feOffset dx="-90" dy="-90" result="warpOffset"></feOffset>
      <feDisplacementMap
        xChannelSelector="R"
        yChannelSelector="G"
        scale="30"
        in="SourceGraphic"
        in2="warpOffset"
      ></feDisplacementMap>
    </filter>
    <filter id="fe2">
      <feTurbulence id="animation" type="fractalNoise" baseFrequency="9.9999999 0.00001" numOctaves="1" result="warp">
        <animate
          attributeName="baseFrequency"
          from="9.9999999 0.00001"
          to="0.009 0.00001"
          dur="2s"
          repeatCount="indefinite"
        />
      </feTurbulence>
      <feOffset dx="-90" dy="-90" result="warpOffset"></feOffset>
      <feDisplacementMap
        xChannelSelector="R"
        yChannelSelector="G"
        scale="30"
        in="SourceGraphic"
        in2="warpOffset"
      ></feDisplacementMap>
    </filter>
  </defs>
</svg>
SVG Animation
SVG CSS Animation
CSS animation on SVG properties:
circle {
  animation: zoom-in-out 1s infinite alternate;
}

@keyframes zoom-in-out {
  from {
    r: 60px;
  }

  to {
    r: 75px;
  }
}
SVG SMIL Animation
SVG SMIL animation:
<svg width="360" height="200" xmlns="http://www.w3.org/2000/svg">
  <text font-family="microsoft yahei" font-size="40" x="0" y="0" fill="#cd0000">
    马
    <animateMotion
      path="M10,80 q100,120 120,20 q140,-50 160,0"
      begin="0s"
      dur="3s"
      rotate="auto"
      repeatCount="indefinite"
    />
  </text>
  <path d="M10,80 q100,120 120,20 q140,-50 160,0" stroke="#cd0000" stroke-width="2" fill="none" />
</svg>
SVG API
const svgElement = document.createElementNS('http://www.w3.org/2000/svg', 'svg')
const svgRectElement = document.createElementNS(
  'http://www.w3.org/2000/svg',
  'rect'
)
SVG Reference
- SVG filter complete guide.
CSS Interaction
Cursor
auto/default/pointer/move/text.wait/help/crosshair/progress.not-allowed/no-drop/vertical-text/all-scroll.none/alias/cell/copy/context-menu.grab/grabbing.n-resize/e-resize/s-resize/w-resize.ne-resize/nw-resize/se-resize/sw-resize.col-resize/row-resize.ew-resize/ns-resize/nesw-resize/nwse-resize.zoom-in/zoom-out.url().
.wrap {
  pointer-events: none;
  cursor: default;
}
Pointer Events
auto.none:- 不能阻止键盘行为: 元素依然可以通过
Tab键被focus. - 无法显示
[title]等A11Y提示, 影响无障碍访问 (特别是移动端). - 综上所述,
none不适合<a>/<button>等控件元素, 适合作用在装饰性的或仅用作视觉表现的非控件元素.
- 不能阻止键盘行为: 元素依然可以通过
- 具有继承性.
Touch Action
auto: enable all panning and zooming gestures.none: disable all panning and zooming gestures.manipulation: only enable panning and pinch zoom gestures (滚动, 持续缩放), remove click delay (300ms) for mobile device.[pan-x | pan-left | pan-right ] || [ pan-y | pan-up | pan-down ] || pinch-zoom.
.box {
  touch-action: auto;
  touch-action: none;
  touch-action: manipulation;
  touch-action: pan-x;
  touch-action: pan-left;
  touch-action: pan-right;
  touch-action: pan-y;
  touch-action: pan-up;
  touch-action: pan-down;
  touch-action: pinch-zoom;
  touch-action: pan-left pan-up;
}
Resize
none.both.horizontal.vertical.inline.block.- 不支持内联元素.
- 支持
overflownon-visible块级元素. - 可用
min-width/min-height/max-width/max-height限制拉伸范围.
.editable {
  overflow: hidden;
  resize: both;
}
<div class="image-slider">
  <div class="image-before">
    <img src="cat-before.jpg" alt="Before" />
  </div>
  <img class="image-after" src="cat-after.jpg" alt="After" />
  <input type="range" class="image-a11y-control" />
</div>

<style>
  .image-slider {
    position: relative;
    display: inline-block;
  }

  .image-slider img {
    display: block;
    user-select: none;
  }

  .image-slider > div {
    position: absolute;
    top: 0;
    bottom: 0;
    left: 0;
    width: 50%; /* resizable width */
    max-width: 100%;
    overflow: hidden;
    resize: horizontal;
  }

  .image-slider > div::before {
    position: absolute;
    right: 0;
    bottom: 0;
    width: 12px;
    height: 12px;
    padding: 5px;
    cursor: ew-resize;
    content: '';
    background: linear-gradient(-45deg, white 50%, transparent 0);
    background-clip: content-box;
  }
</style>

<script>
  /* Additional range input feature */
  const range = document.querySelector('.image-a11y-control')
  range.addEventListener('input', (event) => {
    document.querySelector('.image-before').style.width = `${event.target.value}%`
  })
</script>
User Select
禁止图文被选中, 保持和原生 App 一样的文字选中体验:
.body {
  -webkit-touch-callout: none;
  user-select: none;
}
点击任意位置实现全选效果:
.box {
  user-select: all;
}
Caret Color
输入框光标颜色:
input {
  caret-color: red;
}
CSS Scrolling
Scroll Behavior
auto.smooth.
html,
body {
  scroll-behavior: smooth;
}
Overscroll Behavior
auto{1,2}.contain{1,2}: 嵌套滚动不会传导至相邻区域, 即嵌套滚动条滚动到底部便停止, 不会继续滚动外部滚动条.none{1,2}.
Scroll Snap
- 可让网页容器滚动停止时, 自动平滑定位到指定元素的指定位置.
- Parent (scroll port) property:
scroll-snap-type.scroll-padding.overscroll-behavior.- Overflow axis.
- Children (scroll item) property:
<div class="scroll-x">
  <img src="1.jpg" />
  <img src="2.jpg" />
  <img src="3.jpg" />
  <img src="4.jpg" />
</div>

<style>
  .scroll-x {
    max-width: 414px;
    height: 420px;
    overflow: auto;
    white-space: nowrap;
    scroll-snap-type: x mandatory;
  }

  .scroll-x img {
    scroll-snap-align: center;
    scroll-snap-stop: always;
  }
</style>
Scroll Snap Type
none.[ x | y | inline | block | both ] [ mandatory | proximity ]?:x: 捕捉水平定位点.y: 捕捉垂直平定位点.inline: 捕捉和内联元素排列一个滚动方向的定位点, 默认文档流下指的就是水平轴.block: 捕捉和块状元素排列一个滚动方向的定位点, 默认文档流下指的就是垂直轴.both: 横轴与纵轴都捕捉.mandatory: 强制定位, 若存在有效的定位点位置, 则滚动容器必须在滚动结束时进行定位.proximity: 大约定位, 让浏览器自己判断要不要定位.
Scroll Padding
auto{1,4}.<length-percentage>{1,4}.
Scroll Snap Align
none{1,2}.start{1,2}: 起始位置对齐, 子元素对齐容器左边缘/上边缘.end{1,2}: 结束位置对齐, 子元素对齐容器右边缘/下边缘.center{1,2}: 居中对齐, 子元素中心和滚动容器中心一致.
Scroll Snap Stop
normal: 可以忽略捕获位置.always: 不能忽略捕获位置, 且必须定位到第一个捕获元素的位置, 保证每次只滚动一屏或一个指定元.
Scroll Margin
0.<length>{1,4}.
Overflow Anchor
auto: 开启滚动锚定.none: 关闭滚动锚定.
Overflow Scrolling
overflow: scroll 剪裁界线为 padding box.
但部分浏览器不符合这一标准.
实际项目开发时, 要尽量避免滚动容器设置 padding-bottom 值:
- 跨浏览器样式表现不一致.
- 跨浏览器
scrollHeight值不一致.
Horizontal Scrolling
Horizontal Scrolling Principles
Horizontal scrolling design:
- Avoid a full-screen horizontal scroll; ensure that users know there is also content that can be reached using a traditional method.
- Make scroll interactions obvious and provide instruction.
- To avoid accessibility issues, ensure that horizontal scrolling elements also work with keyboard navigation.
- Design horizontal scrolling elements in containers using HTML and CSS.
- Use visual cues, such as partial images, to show that there is a horizontal scroll action in effect.
- Use partial horizontal scrolling with a static design element for stability.
- Design horizontal scroll bars in the same manner as vertical scroll bars to create an element of familiarity for users.
Horizontal Scrolling Methods
- Transform: rotate
90degelement. - Flex.
- Grid.
- Scroll snap.
.scroll-container {
  width: 100%;
  overflow: auto hidden;
  white-space: nowrap;

  /* Hide scrollbar in IE and Firefox */
  -ms-overflow-style: none;
  scrollbar-width: none;
}

/* Hide scrollbar in Chrome */
.scroll-container::-webkit-scrollbar {
  display: none;
}

.scroll-container .item {
  display: inline-flex;
}

@supports (display: grid) {
  .scroll-container {
    display: grid;
    grid-template-rows: auto;
    grid-auto-flow: column;
    max-width: min-content;
  }
}

@supports (scroll-snap-type: x mandatory) {
  .scroll-container {
    scroll-snap-type: x mandatory;
    scroll-padding: 0 1.2rem;
  }

  .scroll-container .item {
    scroll-snap-align: center;
  }
}
Custom Scrollbar
Scroll bars take up space within padding box.
Standard Custom Scrollbar
auto.thin.none.
auto.<color>{2}.
Chrome Custom Scrollbar
- 整体部分:
::-webkit-scrollbar. - 两端按钮:
::-webkit-scrollbar-button. - 外层轨道:
::-webkit-scrollbar-track. - 内层轨道:
::-webkit-scrollbar-track-piece. - 滚动滑块:
::-webkit-scrollbar-thumb. - 边角:
::-webkit-scrollbar-corner.
.demo::-webkit-scrollbar {
  /* 滚动条整体样式 */

  /* 高宽分别对应横竖滚动条的尺寸 */
  width: 10px;
  height: 1px;
}

.demo::-webkit-scrollbar-thumb {
  background-color: blue;
  background-image: linear-gradient(
    45deg,
    rgb(255 255 255 / 20%) 25%,
    transparent 25%,
    transparent 50%,
    rgb(255 255 255 / 20%) 50%,
    rgb(255 255 255 / 20%) 75%,
    transparent 75%,
    transparent
  );

  /* 滚动条方块 */
  border-radius: 10px;
}

.demo::-webkit-scrollbar-track {
  background-color: #ededed;

  /* 滚动条轨道 */
  border-radius: 10px;
  box-shadow: inset 0 0 5px rgb(0 0 0 / 20%);
}
Hidden Custom Scrollbar
.scroll-none {
  overflow: hidden auto;
  scrollbar-width: none; /* FireFox */
  -ms-overflow-style: none; /* IE 10+ */
}

.scroll-none::-webkit-scrollbar {
  /* Chrome Safari */
  display: none;
  width: 0;
  height: 0;
}
Media Query
- Logical operators + media types + media features.
- Only for improving compatibility with older browsers.
- Definition order matters when media query with a different selector.
- JavaScript API:
window.matchMedia().
/* screen size : 500px ~ 1000px */
@media only screen and (width >= 500px) and (width <= 1000px) {
  .container {
    width: 750px;
  }
}
Media Logical Query
only: only specific media type.not: negate entire media query.and: all.,: any.
@media (height > 600px) {
  body {
    line-height: 1.4;
  }
}

@media (400px <= width <= 700px) {
  body {
    line-height: 1.4;
  }
}
Media Type Query
| Type | Query |
|---|---|
| all | 所有设备 |
| 文档打印或打印预览模式 | |
| screen | 彩色电脑屏幕 |
| Deprecated Query | |
| braille | 盲文 |
| embossed | 盲文打印 |
| handheld | 手持设备 |
| projection | 项目演示, 比如幻灯 |
| speech | 演讲 |
| tty | 固定字母间距的网格的媒体, 比如电传打字机 |
| tv | 电视 |
Media Feature Query
| Feature | Value | Min/Max | Query |
|---|---|---|---|
| grid | <integer> | no | 是否基于格栅的设备 |
| orientation | portrait/landscape | no | 横屏或竖屏 |
| aspect-ratio | <integer>/<integer> | yes | 渲染界面宽高比例 |
| device-aspect-ratio | <integer>/<integer> | yes | 设备屏幕宽高比例 |
| monochrome | <integer> | yes | 缓冲器中每像素字节 |
| resolution | <resolution> | yes | 分辨率 |
| width | <length> | yes | 渲染界面的宽度 |
| height | <length> | yes | 渲染界面的高度 |
| device-width | <length> | yes | 设备屏幕的输出宽度 |
| device-height | <length> | yes | 设备屏幕的输出高度 |
| color | <integer> | yes | 每种色彩的字节数 |
| color-index | <integer> | yes | 色彩表中的色彩数 |
Print Device Query
@media print {
  header,
  footer {
    display: none;
  }

  table {
    color-adjust: exact;
  }

  h2 {
    break-before: page;
  }
}
- Page style standard specification.
- PDF style tutorial.
Hover and Pointer Device Query
| Hover Query | Pointer Query | Device |
|---|---|---|
| none | coarse | smartphones, touch screens |
| none | fine | stylus-based screens |
| hover | coarse | smart TVs, video game consoles |
| hover | fine | desktop computers, laptops, touch pads |
Hover Device Query
hover/any-hover:
none.hover.
<a href="#">Try hovering over me!</a>

<style>
  @media (hover: hover) {
    a:hover {
      background: yellow;
    }
  }

  @media (any-hover: hover) {
    a:hover {
      background: yellow;
    }
  }
</style>
Pointer Device Query
pointer/any-pointer:
none: no pointer device (e.g phones).coarse: limited accuracy pointer device (e.g smart TV, video game consoles).fine: accurate pointer device (e.g mouse, touch pads, stylus).
<input id="test" type="checkbox" /> <label for="test">Look at me!</label>

<style>
  input[type='checkbox'] {
    margin: 0;
    appearance: none;
    border: solid;
  }

  input[type='checkbox']:checked {
    background: gray;
  }

  @media (pointer: fine) {
    input[type='checkbox'] {
      width: 15px;
      height: 15px;
      border-color: blue;
      border-width: 1px;
    }
  }

  @media (pointer: coarse) {
    input[type='checkbox'] {
      width: 30px;
      height: 30px;
      border-color: red;
      border-width: 2px;
    }
  }

  @media (any-pointer: fine) {
    input[type='checkbox'] {
      width: 15px;
      height: 15px;
      appearance: none;
      border: 1px solid blue;
    }
  }

  @media (any-pointer: coarse) {
    input[type='checkbox'] {
      width: 30px;
      height: 30px;
      appearance: none;
      border: 2px solid red;
    }
  }
</style>
Foldable Device Query
/* stylelint-disable-next-line media-feature-name-no-unknown */
@media (horizontal-viewport-segments <= 2) and (vertical-viewport-segments <= 1) {
  main article {
    flex: 1 1 env(viewport-segment-width 0 0);
  }

  main aside {
    flex: 1;
  }
}
Display Mode Query
fullscreen.standalone.minimal-ui.browser.
@media all and (display-mode: fullscreen) {
  body {
    margin: 0;
    border: 5px solid black;
  }
}
Resolution Query
<number>dpi.<number>dpcm.<number>x/<number>dppx:1dppx=96dpi.
/* Exact resolution */
@media (resolution <= 150dpi) {
  p {
    color: red;
  }
}

/* Minimum resolution */
@media (resolution >= 72dpi) {
  p {
    text-decoration: underline;
  }
}

/* Maximum resolution */
@media (resolution <= 300dpi) {
  p {
    background: yellow;
  }
}
Contrast Query
prefers-contrast:
less.more.
@media (prefers-contrast: no-preference) {
  html {
    color: #333;
    background-color: #eee;
  }
}

@media (prefers-contrast: more) {
  html {
    color: #000;
    background-color: white;
  }
}

@media (prefers-contrast: less) {
  html {
    color: #555;
    background: conic-gradient(from 90deg at 50% -10%, #bbb, 50%, #999, #bbb);
  }
}
Color Scheme Query
prefers-color-scheme:
no-preference.light.dark.
html {
  color-scheme: light dark; /* This site supports both light and dark mode */
}

:root {
  /* light styles */
  color-scheme: var(--color-scheme, light);

  --primary-color: black;
  --primary-background: white;

  /* page preference is "dark" */
  &:has(#color-scheme option[value='dark']:checked) {
    --color-scheme: dark;

    /* any additional dark styles */
    --primary-color: white;
    --primary-background: black;
  }

  /* page preference is "system", and system preference is "dark" */
  @media (prefers-color-scheme: dark) {
    &:has(#color-scheme option[value='system']:checked) {
      --color-scheme: dark;

      /* any additional dark styles, again */
      --primary-color: white;
      --primary-background: black;
    }
  }
}

body {
  color: var(--primary-color);
  background: var(--primary-background);
}
const ColorSchemeStorageItemName = 'preferredColorScheme'

/*
 * If a color scheme preference was previously stored,
 * select the corresponding option in the color scheme preference UI
 * unless it is already selected.
 */
function restoreColorSchemePreference() {
  const colorScheme = localStorage.getItem(ColorSchemeStorageItemName)

  if (!colorScheme) {
    // There is no stored preference to restore
    return
  }

  const option = colorSchemeSelectorEl.querySelector(`[value=${colorScheme}]`)

  if (!option) {
    // The stored preference has no corresponding option in the UI.
    localStorage.removeItem(ColorSchemeStorageItemName)
    return
  }

  if (option.selected) {
    // The stored preference's corresponding menu option is already selected
    return
  }

  option.selected = true
}

/*
 * Store an event target's value in localStorage under ColorSchemeStorageItemName
 */
function storeColorSchemePreference({ target }) {
  const colorScheme = target.querySelector(':checked').value
  localStorage.setItem(ColorSchemeStorageItemName, colorScheme)
}

function main() {
  const colorSchemeSelectorEl = document.querySelector('#color-scheme')

  if (colorSchemeSelectorEl) {
    restoreColorSchemePreference()
    colorSchemeSelectorEl.addEventListener('input', storeColorSchemePreference)
  }
}
3 mode switch:
<select name="color-scheme-">
  <option value="system">System</option>
  <option value="light">Forced Light</option>
  <option value="dark">Forced Dark</option>
</select>

<script>
  document.querySelector('color-scheme').addEventListener('change', (e) => {
    document.documentElement.setAttribute('data-force-color-mode', e.target.value)
    localStorage.setItem('preferredColorScheme', e.target.value)
  })

  const mediaQuery = window.matchMedia('(prefers-color-scheme: dark)')
  mediaQuery.addListener(() => {
    // Make sure the dropdown is up-to-date based on mediaQuery.matches
  })
</script>

<style>
  :root,
  :root[data-force-color-mode='light'] {
    /* Default Light Mode colors + Forced Light Mode */
    --primary-color: black;
    --primary-background: white;
  }

  /* Dark Color Scheme (System Preference) */
  @media (prefers-color-scheme: dark) {
    :root {
      --primary-color: white;
      --primary-background: black;
    }
  }

  /* Dark Color Scheme (Override) */
  :root[data-force-color-mode='dark'] {
    --primary-color: white;
    --primary-background: black;
  }
</style>
Reduced Motion Query
prefers-reduced-motion:
no-preference.reduce.
@media (prefers-reduced-motion: reduce) {
  .animated {
    animation: none;
  }
}

@media (prefers-reduced-motion: reduce) {
  *,
  ::before,
  ::after {
    background-attachment: initial !important;
    transition-delay: 0s !important;
    transition-duration: 0s !important;
    animation-duration: 1ms !important;
    animation-delay: -1ms !important;
    animation-iteration-count: 1 !important;
    scroll-behavior: auto !important;
  }
}
Scripting Query
@media (scripting: enabled) {
  .my-element {
    /* enhanced styles if JS is available */
  }
}

@media (scripting: none) {
  .my-element {
    /* fallback styles when JS is not supported */
  }
}

@media (scripting: enabled) and (prefers-reduced-motion: no-preference) {
  /* JS available and motion OK */
}

@media (scripting: none), (prefers-reduced-motion) {
  /* JS disabled or reduced motion enabled */
}
Media Query Support Detection
Detecting media query support in CSS:
/* stylelint-disable-next-line media-feature-name-no-unknown */
@media not all and (prefers-reduced-data), (prefers-reduced-data) {
  color: blue;
}
- No support: not all and (prefers-reduced-data): false, (prefers-reduced-data): false, Combined: false.
- Support, but off: not all and (prefers-reduced-data): true, (prefers-reduced-data): false, Combined: true.
- Support, and on: not all and (prefers-reduced-data): false, (prefers-reduced-data): true, Combined: true.
Detecting media query support in JavaScript:
const query = '(prefers-reduced-data)'

// window.matchMedia(query).media return 'not all' or original query string
const resolvedMediaQuery = window.matchMedia(query).media

const isSupported = query === resolvedMediaQuery
Media Query API
Media query matchMedia:
// https://developer.mozilla.org/docs/Web/API/MediaQueryList
const mql = window.matchMedia(mediaQueryString)
if (window.matchMedia('(min-width: 400px)').matches) {
  /* the view port is at least 400 pixels wide */
} else {
  /* the view port is less than 400 pixels wide */
}
Respond to media query changes:
const match = window.matchMedia('(min-width: 400px)')

match.addEventListener('change', (e) => {
  if (e.matches) {
    /* do a thing */
  } else {
    /* do another thing */
  }
})
Container Query
Container Size Query
当组件出现在同一视口大小 (viewport) 页面下的不同地方时,
e.g .main > .button vs .sidebar > .button,
此时 @media 无法有效实现响应式组件,
使用 @container 可以有效实现响应式组件:
.sidebar {
  container-name: sidebar;
  container-type: inline-size;
}

@container sidebar (min-width: 400px) {
  .card {
    display: grid;
    grid-template-columns: 2fr 1fr;
  }
}
Container Style Query
@container style query direct parent:
@container style(color: hotpink) {
  .card {
    background: white;
  }
}

@container style(font-style: italic) {
  span,
  i,
  .etc {
    background: lavender;
  }
}

@container style(border-color: lightblue) {
  button {
    border-color: royalblue;
  }
}

@container style(--theme: dark) {
  .card {
    color: white;
    background: royalblue;
    border-color: navy;
  }

  .card button {
    color: white;
    background-color: dodgerblue;
    border-color: navy;
  }
}

/* Update the theme on hover */
.card:hover,
.card:focus {
  --theme: dark-hover;
}

/* Apply darkHover theme styles */
@container style(--theme: dark-hover) {
  .card {
    background: dodgerblue;
    border-color: navy;
  }

  .card button {
    background-color: royalblue;
    border-color: lightblue;
  }
}

@container (min-width: 420px) and style(--highlight: true) {
  /* Styles for only highlight components at a minimum width of 420px */
  .title {
    color: var(--highlight-color);
  }
}
@container style query non-direct parent:
<ul class="card-list">
  <li class="card-container">
    <div class="card"></div>
  </li>
</ul>

<style>
  .card-list {
    container-name: cards;
  }

  @container cards style(--theme: warm) {
    .card {
      background-color: wheat;
    }
  }
</style>
Use @container style query to
implement toggle() function:
:is(i, em, blockquote, code) {
  font-style: var(--font-style);

  --font-style: italic;

  @container style(--font-style: italic) {
    --font-style: normal;
  }
}
Container Query Reference
- An interactive and comprehensive CSS container queries guide.
Feature Query
Supports At Rule
@supports (transform-origin: 5% 5%) {
  font-size: 1rem;
}

@supports selector(A > B) {
  font-size: 1rem;
}

@supports not (not (transform-origin: 2px)) {
  font-size: 1rem;
}

@supports (display: grid) and (not (display: inline-grid)) {
  font-size: 1rem;
}

@supports (display: table-cell) and (display: flex) and (display: contents) {
  font-size: 1rem;
}

@supports (transform-style: preserve) or (-moz-transform-style: preserve) or (-o-transform-style: preserve) or
  (-webkit-transform-style: preserve) {
  font-size: 1rem;
}
Supports API
const result = CSS.supports('text-decoration-style', 'blink')
const result = CSS.supports('display: flex')
const result = CSS.supports('(--foo: red)')
const result = CSS.supports(`
  (transform-style: preserve) or (-moz-transform-style: preserve) or
  (-o-transform-style: preserve) or (-webkit-transform-style: preserve)
`)
CSS Accessibility
Screen Reader Only
.sr-only {
  position: absolute;
  width: 1px;
  height: 1px;
  padding: 0;
  margin: -1px;
  overflow: hidden;
  white-space: nowrap;
  border-width: 0;
  clip-path: polygon(0 0, 0 0, 0 0);
}

.not-sr-only {
  position: static;
  width: auto;
  height: auto;
  padding: 0;
  margin: 0;
  overflow: visible;
  white-space: normal;
  clip-path: none;
}
Focusable Areas
Focusable areas:
- Elements whose
tabindexvalue is not null. - The shapes of area elements in an image map.
- The sub-widgets of elements: e.g video controls.
- The scrollable regions of elements.
- The viewport of a
Document. - User agent focusable area.
Keyboard Styles
添加键盘访问样式:
outline.:focus-visible.:focus.
HTML source order vs CSS display order:
float/absolute/flex/grid CSS display order
can't change HTML source tab order.
Graceful Degradation
Write old browser css code, then write modern browser css code:
.grid {
  display: flex;

  /* old browser will ignore this rule */
  display: grid;
}
ARIA
- W3C official ARIA examples.
DPR
Device pixel ratio (DPR):
一般情况下,
PC 屏幕 DPR 为 1,
1 个逻辑像素 = 1 个物理像素,
移动端 DPR 为 2 或 3,
1 个逻辑像素 = 2 或 3 个物理像素,
由此产生
移动端/Retina 屏幕 1px 边框 (pixel border)
问题:
- 伪元素 +
scale变换. border-image.background-image.backgroundgradient.box-shadow.viewport+rem.
.scale-1px {
  position: relative;
  border: none;
}

.scale-1px::after {
  position: absolute;
  bottom: 0;
  width: 100%;
  height: 1px;
  content: '';
  background: #000;
  transform: scaleY(0.5);
  transform-origin: 0 0;
}

.border-image-1px {
  border-width: 0 0 1px;
  border-bottom: none;
  border-image: url('../img/line.png') 0 0 2 0 stretch;
}

.background-image-1px {
  background: url('../img/line.png') repeat-x left bottom;
  background-size: 100% 1px;
}

.background-gradient-1px {
  background:
    linear-gradient(#000, #000 100%, transparent 100%) left / 1px 100% no-repeat,
    linear-gradient(#000, #000 100%, transparent 100%) right / 1px 100% no-repeat,
    linear-gradient(#000, #000 100%, transparent 100%) top / 100% 1px no-repeat,
    linear-gradient(#000, #000 100%, transparent 100%) bottom / 100% 1px no-repeat;
}

.box-shadow-1px {
  box-shadow: inset 0 -1px 1px -1px #c8c7cc;
}
// Change viewport scale
const scale = 1 / window.devicePixelRatio
const viewport = document.querySelector('meta[name="viewport"]')
viewport.setAttribute(
  'content',
  `width=device-width,user-scalable=no,initial-scale=${scale},maximum-scale=${scale},minimum-scale=${scale}`
)

// Set root font size
const docEl = document.documentElement
const fontsize = `${10 * (docEl.clientWidth / 320)}px`
docEl.style.fontSize = fontsize
CSS Performance
Will Change
告知浏览器该元素会有哪些变化的方法, 浏览器可在元素属性真正发生变化之前提前做好对应的优化准备工作:
.will-change-parent:hover .will-change {
  will-change: auto;
  will-change: scroll-position;
  will-change: contents;

  /* <custom-ident> */
  will-change: transform;
  will-change: opacity;
  will-change: left, top;
}
Contain
contain属性允许开发者声明当前元素和它的内容尽可能的独立于 DOM 树的其他部分. 这使得浏览器在重新计算布局/样式/绘图或它们的组合的时候, 只会影响到有限的 DOM 区域, 而不是整个页面:none | strict | content | [ size || layout || style || paint ].sizecontainment: 声明这个元素的尺寸会变化, 不需要去检查它依赖关系中的尺寸变化.layoutcontainment: 声明没有外部元素可以影响它内部的布局, 反之亦然.stylecontainment: 声明那些同时会影响这个元素和其子孙元素的属性, 都在这个元素的包含范围内.paintcontainment: 声明这个元素的子孙节点不会在它边缘外显示. 如果一个元素在视窗外或因其他原因导致不可见, 则同样保证它的子孙节点不会被显示.
.box {
  /* 无布局包含 */
  contain: none;

  /* 布局包含 size/layout/style/paint */
  contain: strict;

  /* 布局包含 layout/style/paint */
  contain: content;

  /* 布局包含 size */
  contain: size;

  /* 布局包含 layout */
  contain: layout;

  /* 布局包含 style */
  contain: style;

  /* 布局包含 paint */
  contain: paint;
}
Content Visibility
visible: element contents are laid out and rendered as normal.hidden: hide element while preserving its rendering state, if there are any changes that need to happen, they only happen when the element is shown again (i.e.content-visibility: hiddenproperty is removed).display: nonedestroys element rendering state,visibility: hiddendoesn't truly remove element.auto: element turns onlayout,styleandpaintcontainment, 可用于实现 lazy loading, virtualized list.
.content {
  /* <length> values */
  contain-intrinsic-size: 1000px;
  contain-intrinsic-size: 10rem;

  /* Keyword values */
  content-visibility: visible;
  content-visibility: hidden;
  content-visibility: auto;
}

.p {
  contain-intrinsic-size: 320px; /* 预设高度, 防止滚动条频繁抖动 */
  content-visibility: auto;
}
const observer = new ResizeObserver((entries) => {
  for (const entry of entries) {
    if (entry.target.getBoundingClientRect().height > 0) {
      observer.unobserve(entry.target)
      entry.target.classList.remove('content-visibility-auto')
    }
  }
})

for (const element of document.querySelectorAll('.content-visibility-auto'))
  observer.observe(element)
CSS Selectors Performance
减少选择器的复杂性, 与构造样式本身的其他工作相比, 选择器复杂性可以占用计算元素样式所需时间的 50%以上:
- 避免使用统配选择器:
*. - 避免使用后代选择器 (开销较高):
.anchor .link->.anchor-link. - 避免使用标签子代选择器:
.list > li->.list > .item(better) ->.list-item(best).
CSS Triggers Performance
Avoid to frequently change CSS property
and call JavaScript API triggering layout stage (reflow):
Layoutstage triggers:display.position.float.top/bottom/left/right.width.height.min-height.margin.padding.border/border-width.overflow/overflow-y.font-familyfont-size.font-weight.white-space.line-height.vertical-align.text-align.clear.
Paintstage triggers:background/background-image/background-repeat/background-position/background-sizeborder-radius/border-style.box-shadow.outline/outline-width/outline-style/outline-color.color.text-decoration.visibility.
Compositestage triggers:cursor.opacity.transform.z-index.
CSS Loading Performance
- Avoid
@import:- In HTML.
- In CSS especially;
- Beware of oddities with the
PreLoad Scanner.
- Be wary of synchronous CSS and JavaScript order:
- JavaScript defined after CSS won't run until CSSOM is completed.
- If JavaScript doesn't depend on CSS: load it before CSS.
- If JavaScript does depend on CSS: load it after CSS.
- Load CSS as the DOM needs it:
- Unblocks
Start Renderand allows progressive rendering. - Avoid flash of un-styled content.
- Avoid re-rendering and repaint for initial page:
put
Critical CSSin HTML footer will lead to entire DOM re-rendering and repaint.
- Unblocks
- Lazyload any CSS not needed for
Start Render:- Only load
Critical CSSin<head>. - Splitting CSS into
Media Queries.
- Only load
<!-- Doesn't block rendering -->
<link rel="preload" href="/path/to/split.css" as="style" />

<!-- Loading media query -->
<link rel="stylesheet" href="/path/to/split.css" media="print" onload="this.media = 'all'" />
Animation Performance
- CSS 高性能动画三要素:
absoluteposition: 脱离文档流, 不会导致其他元素重排或重绘.opacity: high performance trigger.transform: high performance trigger.
- Animation performance tier list:
- All animation:
keyframeanimation ortransitionsis best. - JS-based animation:
requestAnimationFrameis better thansetTimeout/setInterval. - Position animation:
transform: translate(npx, npx)is better thantop/right/bottom/left. - Scale animation:
transform: scale(n)better thanwidth/height. - Rotation animation:
transform: rotate(deg)is better. - Opacity/visibility animation:
opacity: 0...1is better.
- All animation:
Animation Frame
window.requestAnimationFrame:
- Reflow:
JavaScript -> Style -> Layout -> Paint -> Composite. - Repaint:
Paint -> Composite.
告诉浏览器希望执行动画并请求浏览器在下一次重绘之前调用指定的函数来更新动画. 该方法使用一个回调函数作为参数, 这个回调函数会在浏览器重绘之前调用.
若想要在下次重绘时产生另一个动画画面, callback 必须调用 requestAnimationFrame.
let start = null
const element = document.getElementById('SomeElementYouWantToAnimate')
element.style.position = 'absolute'

function step(timestamp) {
  if (!start)
    start = timestamp

  const progress = timestamp - start
  element.style.left = `${Math.min(progress / 10, 200)}px`

  if (progress < 2000)
    window.requestAnimationFrame(step)
}

window.requestAnimationFrame(step)
Animation DevTools
DevTools for animation performance:
- Slower CPU simulation in
performancepanel. - Enable paint instrumentation in
performancepanel. - FPS meter in
renderingpanel. - Paint flashing in
renderingpanel. layerspanel.
CSS Imports Performance
link is parallel, @import isn't parallel.
CSS Performance Reference
- CSS optimization guide.
CSS Hacks
Property Hacks
利用低版本浏览器无法识别新的属性值:
.loading {
  background: url('/images/loading.gif');
  background: url('/images/loading.png'), linear-gradient(transparent, transparent);
}

.shadow {
  border: 1px solid #ddd;
  border: 1px solid rgb(0 0 0 / 0%);
  box-shadow: 2px 2px;
}
Selector Hacks
利用低版本浏览器无法识别新的选择器 (,):
/* Webkit */
:-webkit-any(tag-not-found),
.class {
  font-size: 1rem;
}

/* Firefox */
tag-not-found::-moz-progress-bar,
.class {
  font-size: 1rem;
}

/* Chromium Edge */
tag-not-found::-ms-any,
.class {
  font-size: 1rem;
}

/* IE9+ */
:checked,
:disabled,
tag-not-found::before,
tag-not-found::after,
tag-not-found::selection,
.class {
  font-size: 1rem;
}

/* IE10+ */
:valid,
:invalid,
:required,
:optional,
.class {
  font-size: 1rem;
}

/* IE11+ */
tag-not-found::backdrop,
.class {
  font-size: 1rem;
}
CSS Hacks Reference
- Browser hacks.
CSS Tools
PostCSS
CSS Vendor Prefix
CSS vendor prefix order:
-moz-rule.-ms-rule.-o-rule.-webkit-rule.- Standard rule.
CSS Normalize
html,
body {
  box-sizing: border-box;
  height: 100%;
  padding: 0;
  margin: 0;
  font-size: 100%;
}

body {
  min-height: 100vh;
  line-height: 1.5;
}

body,
h1,
h2,
h3,
h4,
p,
figure,
blockquote,
dl,
dd {
  margin: 0;
}

input,
textarea,
img,
video,
object {
  box-sizing: border-box;
  max-inline-size: 100%;
  max-width: 100%;
  block-size: auto;
  height: auto;
  aspect-ratio: 16/9;
  object-fit: cover;
}

button,
input,
textarea,
select {
  font: inherit;
}

button {
  padding: 0;
  font: inherit;
  color: inherit;
  text-align: inherit;
  appearance: none;
  cursor: pointer;
  background: none;
  border: none;
  border-radius: 0;
  box-shadow: none;
}

@media (prefers-reduced-motion: reduce) {
  html:focus-within {
    scroll-behavior: auto;
  }

  *,
  *::before,
  *::after {
    transition-duration: 0.01ms !important;
    animation-duration: 0.01ms !important;
    animation-iteration-count: 1 !important;
    scroll-behavior: auto !important;
  }
}
CSS Feature Detection
<script>
  if (window.CSSPropertyRule) {
    const root = document.documentElement
    root.classList.add('supports-at-property')
  }
</script>

<style>
  .supports-at-property optgroup {
    font-size: 0;
  }
</style>
StyleLint
stylelint-config-mass plugin index.js:
module.exports = {
  extends: ['stylelint-config-sass-guidelines'],
  rules: {
    'order/properties-order': [
      'position',
      'z-index',
      'top',
      'right',
      'bottom',
      'left',
      'box-sizing',
      'display',
      'visibility',
      'opacity',
      'mix-blend-mode',
      'isolation',
      'float',
      'clear',
      'flex',
      'flex-basis',
      'flex-direction',
      'flex-flow',
      'flex-grow',
      'flex-shrink',
      'flex-wrap',
      'grid',
      'grid-template',
      'grid-template-areas',
      'grid-template-rows',
      'grid-template-columns',
      'grid-area',
      'grid-row',
      'grid-row-start',
      'grid-row-end',
      'grid-column',
      'grid-column-start',
      'grid-column-end',
      'grid-auto-rows',
      'grid-auto-columns',
      'grid-auto-flow',
      'gap',
      'row-gap',
      'column-gap',
      'place-content',
      'place-items',
      'place-self',
      'align-content',
      'align-items',
      'align-self',
      'justify-content',
      'justify-items',
      'justify-self',
      'order',
      'columns',
      'column-gap',
      'column-fill',
      'column-rule',
      'column-rule-width',
      'column-rule-style',
      'column-rule-color',
      'column-span',
      'column-count',
      'column-width',
      'backface-visibility',
      'perspective',
      'perspective-origin',
      'transform',
      'transform-origin',
      'transform-style',
      'transition',
      'transition-delay',
      'transition-duration',
      'transition-property',
      'transition-timing-function',
      'width',
      'min-width',
      'max-width',
      'height',
      'min-height',
      'max-height',
      'overflow',
      'overflow-x',
      'overflow-y',
      'resize',
      'margin',
      'margin-top',
      'margin-right',
      'margin-bottom',
      'margin-left',
      'padding',
      'padding-top',
      'padding-right',
      'padding-bottom',
      'padding-left',
      'border',
      'border-top',
      'border-right',
      'border-bottom',
      'border-left',
      'border-width',
      'border-top-width',
      'border-right-width',
      'border-bottom-width',
      'border-left-width',
      'border-style',
      'border-top-style',
      'border-right-style',
      'border-bottom-style',
      'border-left-style',
      'border-radius',
      'border-top-left-radius',
      'border-top-right-radius',
      'border-bottom-left-radius',
      'border-bottom-right-radius',
      'border-color',
      'border-top-color',
      'border-right-color',
      'border-bottom-color',
      'border-left-color',
      'outline',
      'outline-offset',
      'outline-width',
      'outline-style',
      'outline-color',
      'box-shadow',
      'list-style',
      'list-style-type',
      'list-style-position',
      'list-style-image',
      'table-layout',
      'caption-side',
      'border-collapse',
      'border-spacing',
      'empty-cells',
      'animation',
      'animation-name',
      'animation-duration',
      'animation-timing-function',
      'animation-delay',
      'animation-iteration-count',
      'animation-direction',
      'animation-fill-mode',
      'animation-play-state',
      'background',
      'background-attachment',
      'background-clip',
      'background-color',
      'background-image',
      'background-origin',
      'background-position',
      'background-repeat',
      'background-size',
      'background-blend-mode',
      'cursor',
      'color',
      'font',
      'font-family',
      'font-kerning',
      'font-size',
      'font-size-adjust',
      'font-stretch',
      'font-weight',
      'font-smoothing',
      'osx-font-smoothing',
      'font-variant',
      'font-style',
      'tab-size',
      'text-align',
      'text-align-last',
      'text-justify',
      'text-indent',
      'text-transform',
      'text-decoration',
      'text-decoration-color',
      'text-decoration-line',
      'text-decoration-style',
      'text-decoration-thickness',
      'text-rendering',
      'text-shadow',
      'text-overflow',
      'line-height',
      'word-spacing',
      'letter-spacing',
      'white-space',
      'word-break',
      'word-wrap',
      'vertical-align',
      'content',
      'quotes',
      'counter-reset',
      'counter-increment',
      'page-break-before',
      'page-break-after',
      'page-break-inside',
      'pointer-events',
      'will-change',
    ],
    'order/properties-alphabetical-order': null,
    'selector-class-pattern': [
      '^[a-z0-9\\-\\_]+$',
      {
        message:
          'Selector should be written in lowercase with hyphens (selector-class-pattern)',
      },
    ],
  },
}
StyleLint plugins:
Tailwind
Tailwind Configuration
Missing .html/.tsx/.vue directory
will lead to class purged.
Tailwind Directives
@layer base {
  h1 {
    @apply text-3xl;
  }
}

@layer components {
  .primary-btn {
    @apply bg-yellow-600 hover:bg-yellow-800 text-black font-bold py-4 px-6 shadow-md;
  }
}
CSS Style Guide
CSS Property Order
显示属性 -> 自身属性 -> 文本属性.
Display Property Order
- position.
- z-index.
- top.
- right.
- bottom.
- left.
- box-sizing.
- display.
- visibility.
- float.
- clear.
Self Property Order
- width.
- min-width.
- max-width.
- height.
- min-height.
- max-height.
- overflow.
- padding.
- padding-top.
- padding-right.
- padding-bottom.
- padding-left.
- margin.
- margin-top.
- margin-right.
- margin-bottom.
- margin-left.
- border.
- border-width.
- border-top-width.
- border-right-width.
- border-bottom-width.
- border-left-width.
- border-style.
- border-top-style.
- border-right-style.
- border-bottom-style.
- border-left-style.
- border-color.
- border-top-color.
- border-right-color.
- border-bottom-color.
- border-left-color.
- border-collapse.
- border-spacing.
- outline.
- list-style.
- table-layout.
- caption-side.
- empty-cells.
- background.
- background-color.
- background-image.
- background-repeat.
- background-position.
Text Property Order
- color.
- font.
- font-family.
- font-size.
- font-weight.
- line-height.
- text-align.
- text-indent.
- text-transform.
- text-decoration.
- letter-spacing.
- word-spacing.
- white-space.
- vertical-align.
- opacity.
- cursor.
- content.
- quotes.
CSS Naming Convention
Layout Structure Naming Convention
- 容器: container.
- 页头: header.
- 内容: content.
- 页面主体: main.
- 页尾: footer.
- 导航: nav.
- 侧栏: sidebar.
- 栏目: column.
- 页面外围控制整体佈局宽度: wrapper.
- 左右中: left right center.
Navigation Naming Convention
- 导航: nav.
- 主导航: main-nav.
- 子导航: sub-nav.
- 顶导航: top-nav.
- 边导航: sidebar.
- 左导航: left-sidebar.
- 右导航: right-sidebar.
- 菜单: menu.
- 子菜单: sub-menu.
- 标题: title.
- 摘要: summary.
Functional Component Naming Convention
- 标志: logo.
- 广告: banner.
- 登陆: login.
- 登录条: login-bar.
- 注册: register.
- 搜索: search.
- 功能区: shop.
- 标题: title.
- 加入: join us.
- 状态: status.
- 按钮: btn.
- 滚动: scroll.
- 标籤页: tab.
- 文章列表: list.
- 提示信息: msg.
- 当前的: current.
- 小技巧: tips.
- 图标: icon.
- 注释: note.
- 指南: guide.
- 服务: service.
- 热点: hot.
- 新闻: news.
- 下载: download.
- 投票: vote.
- 合作伙伴: partner.
- 友情链接: link.
- 版权: copyright.
CSS Files Naming Convention
abstracts:$variables,@mixinfunction.vendors: external libraries (font-awesome, bootstrap).base:normalize.css,reset.css,utils.css,font.css,base.css. (margin-right, text-center, float-right).components:form.css,button.css,navbar.css,dropdown.css.layout:columns.css,grid.css,header.css,footer.css,section.css,navigation.css.pages:home.css,about.css.themes:color.css,font.css.main.css/app.css.
CSS Naming System and Architecture
- BEM: blocks, elements and modifiers.
- OOCSS: object oriented CSS.
- SMACSS: scalable and modular CSS architecture.
- ITCSS: inverted triangle CSS layers.
- A source of inspiration for class naming.
