DOM API
DOM Width and Height
- outerHeight: 整个浏览器窗口的大小, 包括窗口标题/工具栏/状态栏等.
- innerHeight: DOM 视口的大小, 包括滚动条.
- offsetHeight: 整个可视区域大小, 包括 border 和 scrollbar 在内 (content + padding + border).
- clientHeight: 内部可视区域大小 (content + padding).
- scrollHeight: 元素内容的高度, 包括溢出部分.

// const supportInnerWidth = window.innerWidth !== undefined;
// const supportInnerHeight = window.innerHeight !== undefined;
// const isCSS1Compat = (document.compatMode || '') === 'CSS1Compat';
const width
  = window.innerWidth
    || document.documentElement.clientWidth
    || document.body.clientWidth
const height
  = window.innerHeight
    || document.documentElement.clientHeight
    || document.body.clientHeight
// 缩放到 100×100
window.resizeTo(100, 100)
// 缩放到 200×150
window.resizeBy(100, 50)
// 缩放到 300×300
window.resizeTo(300, 300)
DOM Rect API
In case of transforms, the offsetWidth and offsetHeight returns the layout width and height (all the same), while getBoundingClientRect() returns the rendering width and height.
getBoundingClientRect:
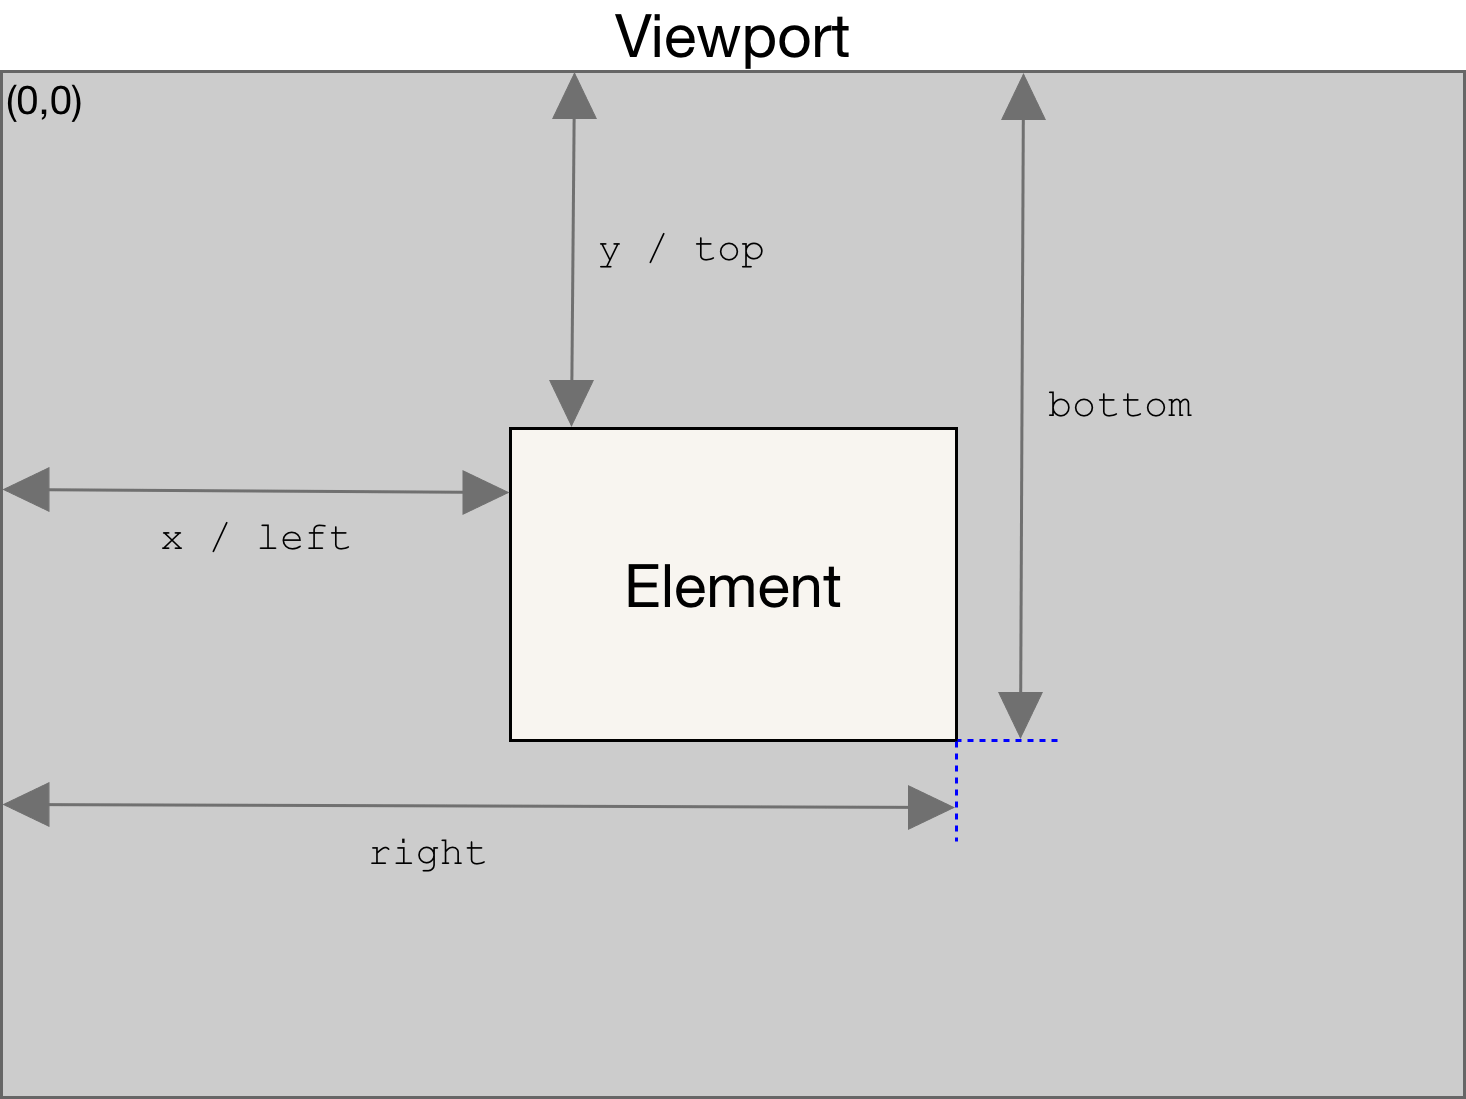
function isElementInViewport(el) {
  const { top, height, left, width } = el.getBoundingClientRect()
  const w
    = window.innerWidth
      || document.documentElement.clientWidth
      || document.body.clientWidth
  const h
    = window.innerHeight
      || document.documentElement.clientHeight
      || document.body.clientHeight

  return top <= h && top + height >= 0 && left <= w && left + width >= 0
}
DOM Left and Top
- offsetLeft/offsetTop: 表示该元素的左上角 (边框外边缘) 与已定位的父容器 (offsetParent 对象) 左上角的距离.
- clientLeft/clientTop:
表示该元素 padding 至 margin 的距离,
始终等于
.getComputedStyle()返回的border-left-width/border-top-width. - scrollLeft/scrollTop: 元素滚动条位置, 被隐藏的内容区域左侧/上方的像素位置.

function getElementLeft(element) {
  let actualLeft = element.offsetLeft
  let current = element.offsetParent

  while (current !== null) {
    actualLeft += current.offsetLeft
    current = current.offsetParent
  }

  return actualLeft
}

function getElementTop(element) {
  let actualTop = element.offsetTop
  let current = element.offsetParent

  while (current !== null) {
    actualTop += current.offsetTop
    current = current.offsetParent
  }

  return actualTop
}
// 把窗口移动到左上角
window.moveTo(0, 0)
// 把窗口向下移动 100 像素
window.moveBy(0, 100)
// 把窗口移动到坐标位置 (200, 300)
window.moveTo(200, 300)
// 把窗口向左移动 50 像素
window.moveBy(-50, 0)
DOM Scroll Size
- scrollLeft/scrollX/PageXOffset: 元素内容向右滚动了多少像素, 如果没有滚动则为 0.
- scrollTop/scrollY/pageYOffset: 元素内容向上滚动了多少像素, 如果没有滚动则为 0.

// const supportPageOffset = window.pageXOffset !== undefined;
// const isCSS1Compat = (document.compatMode || '') === 'CSS1Compat';
const x
  = window.pageXOffset
    || document.documentElement.scrollLeft
    || document.body.scrollLeft
const y
  = window.pageYOffset
    || document.documentElement.scrollTop
    || document.body.scrollTop
if (window.innerHeight + window.pageYOffset === document.body.scrollHeight)
  console.log('Scrolled to Bottom!')
// 相对于当前视口向下滚动 100 像素
window.scrollBy(0, 100)
// 相对于当前视口向右滚动 40 像素
window.scrollBy(40, 0)

// 滚动到页面左上角
window.scrollTo(0, 0)
// 滚动到距离屏幕左边及顶边各 100 像素的位置
window.scrollTo(100, 100)
// 正常滚动
window.scrollTo({
  left: 100,
  top: 100,
  behavior: 'auto',
})
// 平滑滚动
window.scrollTo({
  left: 100,
  top: 100,
  behavior: 'smooth',
})

document.forms[0].scrollIntoView() // 窗口滚动后, 元素底部与视口底部对齐.
document.forms[0].scrollIntoView(true) // 窗口滚动后, 元素顶部与视口顶部对齐.
document.forms[0].scrollIntoView({ block: 'start' })
document.forms[0].scrollIntoView({ behavior: 'smooth', block: 'start' })
DOM Observer
Intersection Observer
// <img class="lzy_img" src="lazy_img.jpg" data-src="real_img.jpg" />
document.addEventListener('DOMContentLoaded', () => {
  const imageObserver = new IntersectionObserver((entries, imgObserver) => {
    entries.forEach((entry) => {
      if (entry.isIntersecting) {
        const lazyImage = entry.target
        console.log('Lazy loading ', lazyImage)
        lazyImage.src = lazyImage.dataset.src

        // only load image once
        lazyImage.classList.remove('lzy')
        imgObserver.unobserve(lazyImage)
      }
    })
  })

  const lazyImages = document.querySelectorAll('img.lzy_img')
  lazyImages.forEach(lazyImage => imageObserver.observe(lazyImage))
})
Mutation Observer
如果文档中连续插入 1000 个 <li> 元素, 就会连续触发 1000 个插入事件,
执行每个事件的回调函数, 这很可能造成浏览器的卡顿;
Mutation Observer 只会在 1000 个段落都插入结束后才会触发, 且只触发一次.
Mutation Observer 有以下特点:
- 它等待所有脚本任务完成后, 才会运行, 即采用异步方式.
- 它把 DOM 变动记录封装成一个数组进行处理, 而不是一条条地个别处理 DOM 变动.
- 记录队列和回调处理的默认行为是耗尽这个队列, 处理每个 MutationRecord, 然后让它们超出作用域并被垃圾回收.
- MutationObserver 实例拥有被观察目标节点的弱引用, 不会妨碍垃圾回收程序回收目标节点.
- 它即可以观察发生在 DOM 节点的所有变动, 也可以观察某一类变动.
- 被观察子树中的节点 (
{ subtree: true }) 被移出子树之后仍然能够触发变化事件.
const mutationObserver = new MutationObserver((mutations) => {
  mutations.forEach((mutation) => {
    console.log(mutation)
  })
})

// 开始侦听页面的根 HTML 元素中的更改.
mutationObserver.observe(document.documentElement, {
  attributes: true,
  characterData: true,
  childList: true,
  subtree: true,
  attributeOldValue: true,
  characterDataOldValue: true,
})
const target = document.querySelector('#container')
function callback(mutations, observer) {
  mutations.forEach((mutation) => {
    switch (mutation.type) {
      case 'attributes':
        // the name of the changed attribute is in
        // mutation.attributeName
        // and its old value is in mutation.oldValue
        // the current value can be retrieved with
        // target.getAttribute(mutation.attributeName)
        break
      case 'childList':
        // any added nodes are in mutation.addedNodes
        // any removed nodes are in mutation.removedNodes
        break
      default:
        throw new Error('Unsupported mutation!')
    }
  })
}

const observer = new MutationObserver(callback)
observer.observe(target, {
  attributes: true,
  attributeFilter: ['foo'], // only observe attribute 'foo'
  attributeOldValue: true,
  childList: true,
})
const observer = new MutationObserver(mutationRecords =>
  console.log(mutationRecords)
)

// 创建两个初始子节点
document.body.appendChild(document.createElement('div'))
document.body.appendChild(document.createElement('span'))

observer.observe(document.body, { childList: true })

// 交换子节点顺序
document.body.insertBefore(document.body.lastChild, document.body.firstChild)
// 发生了两次变化: 第一次是节点被移除, 第二次是节点被添加
// [
//   {
//     addedNodes: NodeList[],
//     attributeName: null,
//     attributeNamespace: null,
//     oldValue: null,
//     nextSibling: null,
//     previousSibling: div,
//     removedNodes: NodeList[span],
//     target: body,
//     type: childList,
//   },
//   {
//     addedNodes: NodeList[span],
//     attributeName: null,
//     attributeNamespace: null,
//     oldValue: null,
//     nextSibling: div,
//     previousSibling: null,
//     removedNodes: NodeList[],
//     target: body,
//     type: "childList",
//   }
// ]
XML Namespace
XML 命名空间可以实现在一个格式规范的文档中混用不同的 XML 语言,
避免元素命名冲突 (tagName/localName/namespaceURI):
<html xmlns="http://www.w3.org/1999/xhtml">
  <head>
    <title>Example XHTML page</title>
  </head>
  <body>
    <s:svg xmlns:s="http://www.w3.org/2000/svg" version="1.1" viewBox="0 0 100 100" style="width: 100%; height: 100%">
      <s:rect x="0" y="0" width="100" height="100" style="fill: red" />
    </s:svg>
  </body>
</html>
console.log(document.body.isDefaultNamespace('http://www.w3.org/1999/xhtml'))
console.log(svg.lookupPrefix('http://www.w3.org/2000/svg')) // "s"
console.log(svg.lookupNamespaceURI('s')) // "http://www.w3.org/2000/svg"

const newSvg = document.createElementNS('http://www.w3.org/2000/svg', 'svg')
const newAttr = document.createAttributeNS('http://www.somewhere.com', 'random')
const elems = document.getElementsByTagNameNS(
  'http://www.w3.org/1999/xhtml',
  '*'
)